A Noob’s Guide to Gluster on ZFS
I run a Dell PowerEdge R710 with effectively 680GB of RAID storage. However, over the years, I’ve added on to my network, and as a result have needed more storage. My haphazard solution for this was to just add additional storage machines I have lying around for things like the network backup server and media storage, but this isn’t very… elegant. Aside from the fact that my data are not centrally accessible, it also means that I have to have between 3 and 5 network shares mounted at any given point.
So, I embarked on a mission to combine my various network storage boxes into one big SAMBA share using GlusterFS. But, I found that the documentation for getting into this, especially for we beginners, is a bit sparse, so I decided to chronicle my journey here.
Part 1: The Hardware
Before we can begin software-linking storage together, we need to have physical storage in the first place. Luckily, Gluster and ZFS are pretty flexible with the hardware they can utilize, so there’s *some *leniency in designing your system. Here’s mine:
Server 1: Violet
Violet is the original NAS. It has 6x146GB SAS drives running in an actual, physical, yes-they-still-exist hardware RAID. I will be including this server by creating a folder in the RAID volume and adding that to the GlusterFS volume.
Server 2: Archimedes
Archimedes is an old HP tower that I’d formerly re-purposed as a media server. Aside from its 80GB boot disk, it has 3x250GB hard drives running in it, which we will be using with ZFS.
Server 3: Newton
Newton is also fashioned from an old HP tower I had lying around. The drive setup here is a bit interesting, though. It too has an 80GB boot drive, but instead of 3x250GB drives, it has 2x250GB drives and 1x320GB drive. This is mostly because I’m cheap and didn’t want to buy another 250GB drive. The beauty of ZFS, however, is that it can use mismatched drive sizes, but each drive behaves as though it were the capacity of the smallest drive. So, it will effectively become a 3x250GB setup, but more on that later.
Part 2: The OS
There has been a lot of drama in the GNU/Linux community in the past over the state of ZFS. Operated by Oracle, for a period around the mid-2010s, ZFS only really ran well on Oracle’s server OS, Solaris. The Linux versions of ZFS were buggy, out-of-date, and generally not very reliable. However, in recent years, thanks to a community effort to further develop the software, ZFS support on traditional Linux platforms has become basically indistinguishable from Solaris.
Which is why, for this project, we’ll be installing Ubuntu Server 18.04 LTS on all the machines. It supports the latest versions of both Gluster and ZFS, and the long-term support ensures stability and updates for years to come.
So, do a fresh install of Ubuntu Server on each machine’s boot disk (not the ZFS storage disks), run updates, and let’s get to the fun stuff.
One thing to note is that, during the Ubuntu Server install, **I highly recommend setting static IP addresses for the different servers so they don’t change between reboots. This can mess up Gluster’s ability to find the other servers.
Part 3: ZFS!
Now for the fun part. I imagine if you made it this far, you probably have some idea of how ZFS works, but here’s a quick rundown. ZFS is a software RAID-style storage utility that makes use of physical drives to create cross-disk redundant storage pools.
First, we need to install ZFS. On Ubuntu, this is as simple as running:
sudo apt install zfsutils-linux -y
Now, we need to identify the drives we are going to use. To do this, log (or SSH) in to the first server and run lsblk to view the drives.
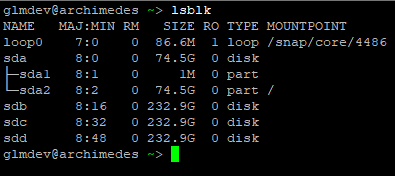
Using the output, identify the drive names for the ZFS storage drives. In my case, these are /dev/sdb, /dev/sdc, and /dev/sdd.
Next, we have to decide what sort of redundancy to use. In my case, I want to use a 1-drive redundancy on each individual server, then use Gluster to pool all the storage together. This means that, on any server, a single drive can fail, and the whole system will continue to run, but the Gluster pool has no server-by-server redundancy (meaning that a failed server will make at least some of the Gluster data inaccessible). This obviously isn’t the most data-secure system, but for my purposes, it’s “good enough” that I’m not concerned in the day-to-day.
Creating the ZFS Pool
Now we can create the actual ZFS pool. We are going to be using ZFS’ RAID-Z format. This is a single-drive parity format that will give us 1 drive of redundancy. (for my 3x250GB machines, this amounts to about 465GB of usable space) To do this, run:
sudo zpool create pool raidz sdb sdc sdd
Where “pool” is the name of the pool (you can name it whatever you want), “raidz” is the format, and that is followed by our drives. The zpool command always has to be run as root.
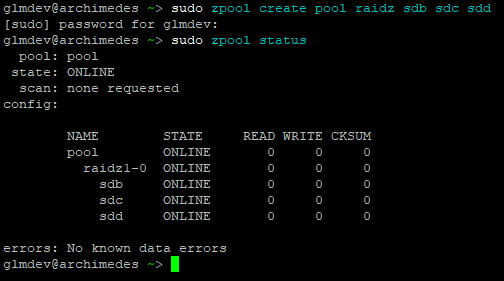
After creating the pool, run sudo zpool status to view (gasp) the status. This is also how you can check if drives in the pool have failed.
By default, ZFS mounts the pool in the root directory. So, in my case, the ZFS pool is mounted at /pool.
Repeat this process, creating ZFS pools, for each of the servers you intend to use in the Gluster volume.
Note: if you are using drives of different sizes, the zpool command will complain about it. To override this, pass it the -f argument like so:
sudo zpool create pool raidz sdb sdc sdd -f
Part 4: Gluster
Finally! We can install Gluster and get our monster network drive online! Well, almost. First we have to do some…
Pre-configuration
Gluster relies on resolvable host-names to find the other servers it needs to talk to. This means that when you run ping server1 or whatever the name of your server is, it needs to actually resolve to that server’s IP address. This is why I suggested setting static IP addresses during the OS install.
There are a few ways of achieving this. For my network, I am using a local-network DNS server. I just manually assigned the host-names to the static IP addresses, and since all the servers use the local DNS server to resolve names, they can find each other. If you don’t have a local DNS server, don’t fret, there is another way.
We are going to edit the /etc/hosts files on each server to map the host names of the other servers to their IP addresses. On each server, open the hosts file in your favorite editor of choice, like so:
 Note: you don’t need to add the address of the server the /etc/hosts file resides on.
sudo nano /etc/hosts
Add the storage server’s static IP addresses, as well as their host names to this file. Save it, close it, and repeat this process for each server you intend to put in the Gluster volume.
Now, we need to install the latest GlusterFS software.
I’ve found that the version of Gluster that is packages in the Ubuntu 18.04 LTS repositories is outdated (largely because the Canonical team refuses to consult the Gluster team on version choices, but whatever). To address this, we’re going to add the Gluster PPA before installing the GlusterFS software.
sudo add-apt-repository ppa:gluster/glusterfs-4.1 && sudo apt update
As of July 2018, GlusterFS 4.1 is the latest build for Ubuntu. Now, we can install the software:
sudo apt install glusterfs-server -y
Note: if, like me, one of your servers is using hardware RAID, simply create a folder in the root drive of that server and mount the RAID drive to that folder. Gluster may complain about it, but it will work.
Creating the Gluster Volume
GlusterFS relies on “peers” to access and store data across servers. To set this up, we need to connect the peers together.
Note: Unless otherwise noted, the rest of the commands from here on only need to be run on one of the servers in the Gluster group, not all of them.
Add the peers by running this command once for each of the servers:
sudo gluster peer probe <server hostname>
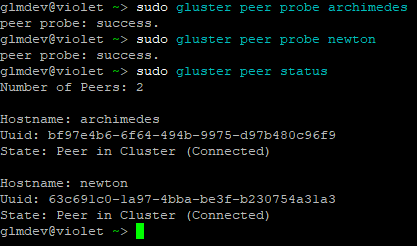
Then, you can check to make sure the peers were added and joined the cluster by running:
sudo gluster peer statusNote: if you are having problems adding peers, try disabling the firewall:sudo ufw disable
Next, create and then start the actual GlusterFS Volume like so:
sudo gluster volume create gv0 server1:/pool server2:/pool
sudo gluster volume start gv0
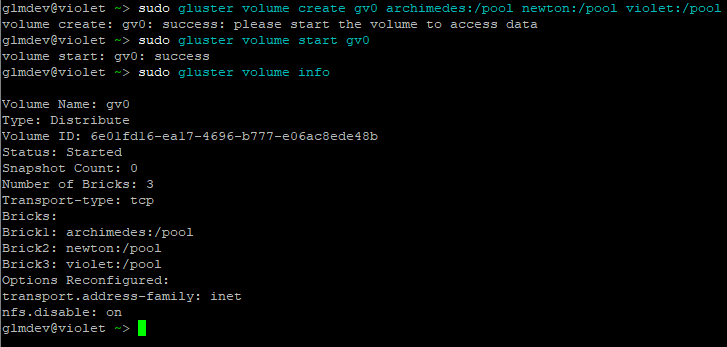
After starting the volume, check its status by running:
sudo gluster volume info
And success! At last, we have our GlusterFS volume up and running.
Step 5: Setting Up SAMBA Access
While we have our GlusterFS volume, we don’t have an easy way to access or use it. So, we’re going to set up a no-permissions SMB share for clients on the network.
Note: I know this isn’t the most secure, but again, for my network it’s “good enough.” Feel free to customize your SMB permissions.
Mounting the GlusterFS Volume
First, let’s mount the GlusterFS volume to a folder. To do this, we’re going to edit /etc/fstab to include the following line:
localhost:/gv0 /gv0 glusterfs defaults,_netdev 0 0
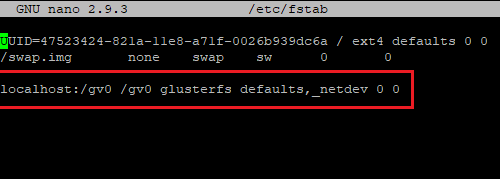
This will permanently mount the GlusterFS volume gv0 attached to localhost to the /gv0 folder. Now, refresh the mounts by running sudo mount -a.
Note: you’ll need to create /gv0.
SAMBA
Install SAMBA on the server with the mounted volume:
sudo apt install samba -y
Now we need to modify the permissions of the directory to allow guests write access:
sudo chown nobody.nogroup -R /gv0
sudo chmod 777 -R /gv0
Then create the share by adding this to the end of /etc/samba/smb.conf:
[gluster-drive]
browseable = yes
path = /gv0
guest ok = yes
read only = no
create mask = 777

Test the syntax by running testparm, and provided everything passed the syntax check, restart SAMBA by running:
sudo service smbd restart ; sudo service nmbd restart
And that’s it!
Success!
We have now successfully created a GlusterFS volume on ZFS nodes, and mounted it for the network to enjoy!

You should now be able to mount your new drive over the network and have read/write access to it.
To stop the Gluster volume, run sudo gluster volume stop gv0 on any of the nodes before shutting them down.
To restart the volume, start up all of the nodes, then run sudo gluster volume start gv0. Don’t forget to sudo mount -a and restart SAMBA.
This has been an incredibly fun project to undertake. If you have any comments, questions, or if you’re having problems getting it to work, leave a comment below!