Linux. When most people think about Linux, they envision hackers and scrolling lines of code; however, today there are many modern Linux distributions (brands, if you will) that offer modern user interfaces and compatible software. These distributions are designed for the end-user; modern, daily driver operating systems. Kali Linux is not among these.
To quote the Kali Documentation, “Kali Linux is the new generation of the industry-leading BackTrack Linux penetration testing and security auditing Linux distribution. Kali Linux is a complete re-build of BackTrack from the ground up, adhering completely to Debian development standards.”
Basically, Kali is the ultimate OS for ethical hackers. It contains tools for secure penetration testing. Basically, it is used to test how secure “secure” systems really are. It is a good way to get into the more advanced functions of computers and networks. If this piques your interest, then stick around. In this tutorial I will be documenting how to write the installer to a USB drive and install Kali Linux to the hard drive or a partition (more on that later).
Side Note: For those of you using VirtualBox or similar, set the Type to Linux and the Version to Oracle (either 64 or 32 bit based on your operating system).
Materials Needed:
USB Flash Drive (4gb or greater)
An Internet Connection
Windows or Linux Computer
A Bit of Patience
Step 1: Downloading Kali
To install Kali, we will boot from an install disc turned USB drive. First, we need the installer ISO. Download this from: Kali Linux Downloads Download Kali Linux Images We generate fresh Kali Linux image files every few months, which we make available for…www.kali.org
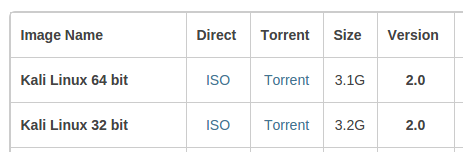
Be sure to select 64/32 bit based on your system.
Step 2a: Formatting the USB Drive (Windows)
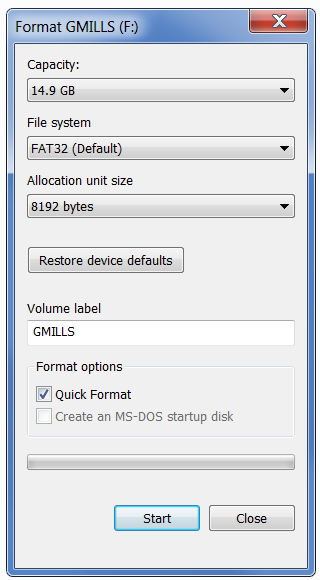
To format the USB drive on a Windows computer, insert the drive and remove any files you want to keep. Right click on the drive and click format. For the file system, select FAT32.
Quick format is fine, unless the drive was in a different format than FAT or NTFS. Then deselect this option.
Step 2b: Formatting the USB Drive (Linux)
For this, we will be using gparted. If you don’t have it, it is available in the default repos on most distributions. Simply issue the installation command.
Ubuntu & Derivatives:
sudo apt-get install gparted
Fedora & Derivatives:
sudo yum install gparted
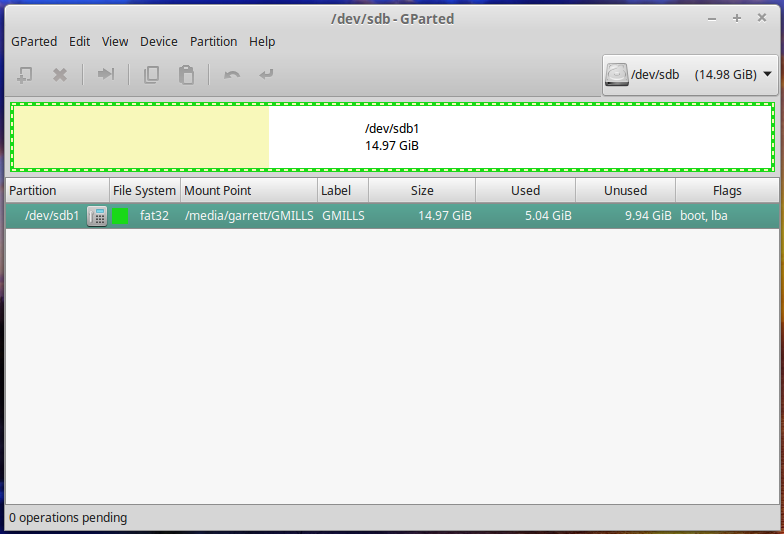
Plug in your drive and open gparted. In the top right corner, and select the /dev/sdb object. Right click the main partition and click unmount.
Under the device menu, select ‘Create Partition Table’ and approve it. You will then see that the drive has been converted to unallocated space. Right click the space, select new.

Change the file system type to FAT16. THIS IS IMPORTANT.
Pick a label and click add. Press Ctrl+Enter to apply the operation.
Step 3: Writing the Installer to the USB
To write the Installation ISO to the USB drive, we will use a program called unetbootin.
Windows — Download from here: UNetbootin UNetbootin allows you to create bootable Live USB drives for Ubuntu and other Linux distributions without burning a CD…unetbootin.github.io
Linux — Available in most repositories.
Ubuntu & co:
sudo apt-get install unetbootin
Fedora & co:
sudo yum install unetbootin
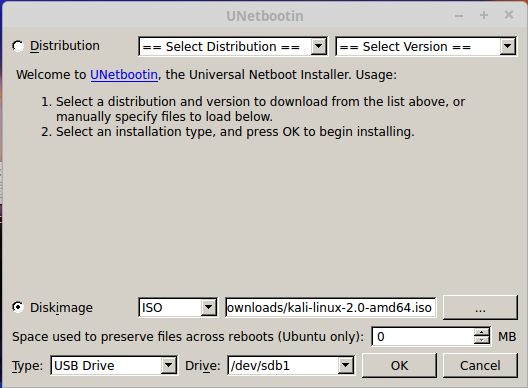
Open the program and select your newly formatted USB drive, as well as the downloaded ISO.
Click OK to begin the process. When it finishes, it will ask you to reboot your computer.
Now the fun starts.
Step 5: Boot
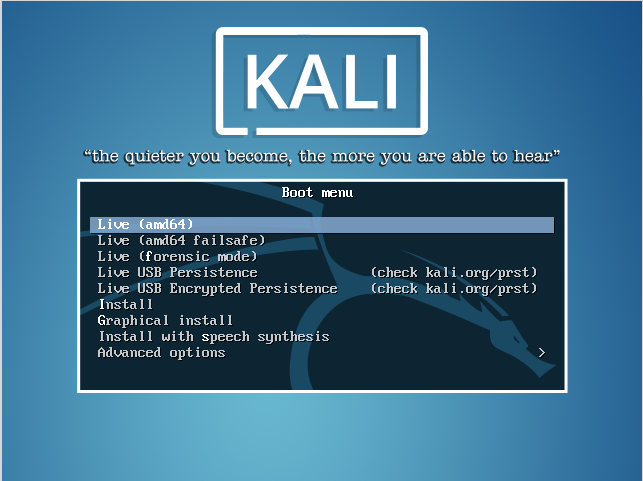
Plug the USB installer into the computer you are installing Kali on. When booting the computer, repeatedly press the trigger key to enter the boot option menu (usually F12), and select the USB drive.
You will then see the Unetbootin bootloader menu. Select the Live Boot option for Kali Linux.
Step 6: Partitioning
If you plan to dual-boot Kali with another OS, you will need to partition the drive to create space for both operating systems. If you are installing Kali by itself, skip this section. On the GNOME3 toolbar, click Show All Applications, and launch gparted.
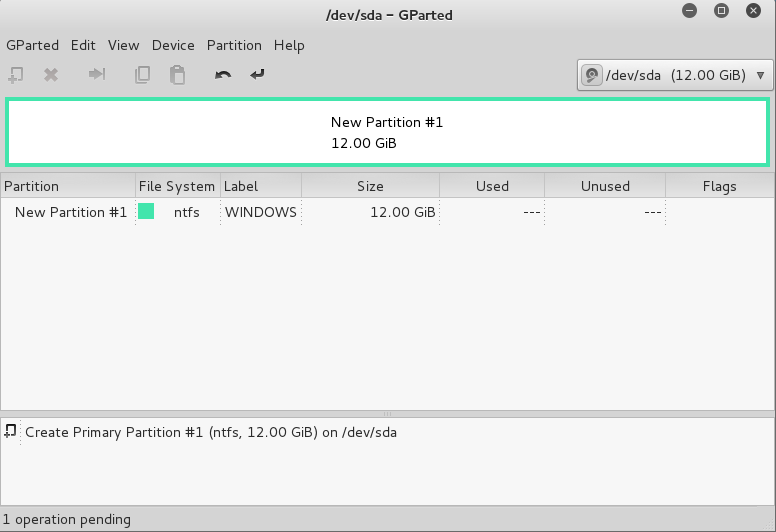
You should get a window looking (more or less) like this (left).
Right click on the existing partition, and click Resize/Move.
NOTE: If you are dual booting Windows with Kali, it is important that you defragment all disks prior to re-sizing the partition, or some files may be lost.
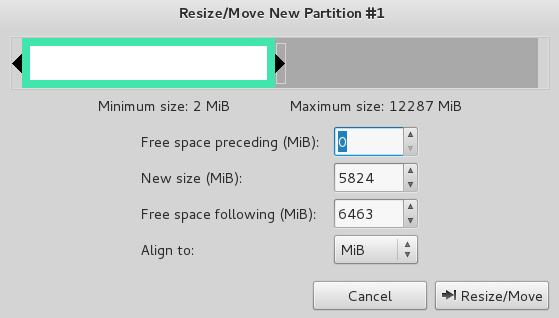
Adjust the partition size to create space for Kali. Kali needs about 10GB for a minimal install with some file storage. Obviously the sizes in this picture (left) are not accurate. Hit resize/move to apply.
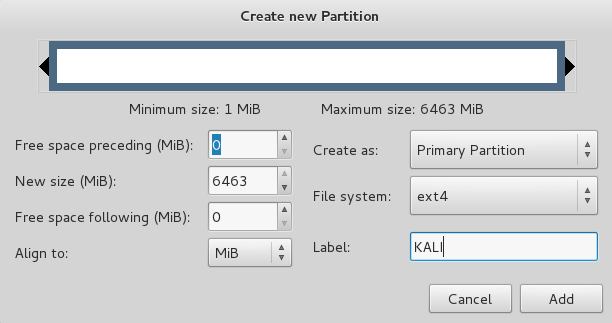
Right click on the new unallocated space, click NEW and create a partition, making sure the Type is ext4.
Next, press Ctrl+Enter to apply the changes.
Step 7: Install
Next, click show applications in the GNOME3 toolbar, and search for install. Launch the application Install Kali. This will launch a graphical wizard installer.
Note: If your installer looks like this (left), and you cannot see all of it, do not fret. Simply press the Windows button to open the GNOME menu, then drag the installer from the current workspace to a new one.
NOTE: If the Kali installer locks itself due to inactivity, the password is toor (root backwards).
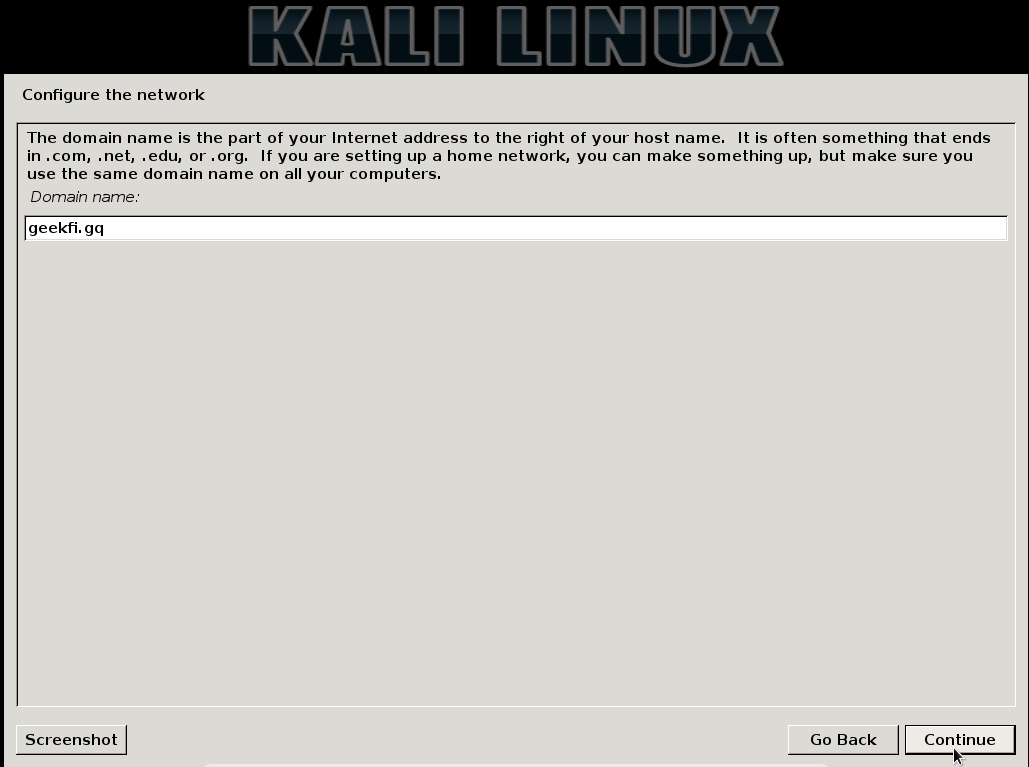
Basically, point and click your way through Location, Language, and Keyboard, and after a bit of loading, you will see a screen asking you to supply a domain name.
This is the domain name the system will use by default (akin to localhost). If you are confused, or don’t have one, just leave this blank.
Set a strong root password, and breeze through the time zone, and it is time to configure the disks.
Step 4: Partitioning
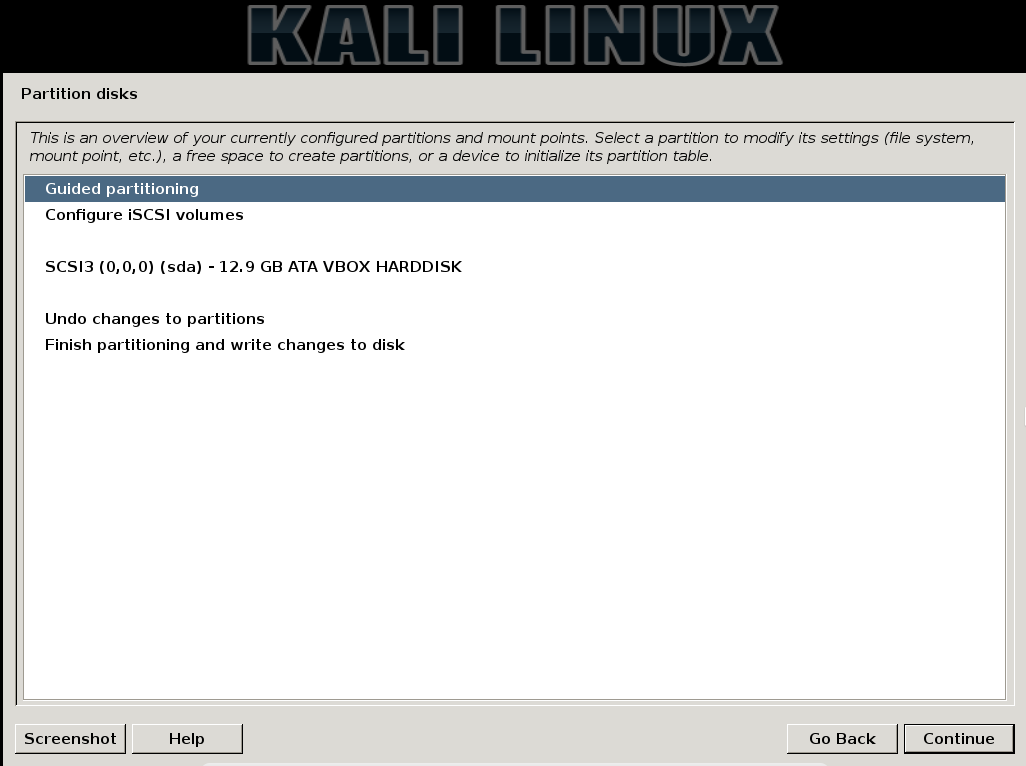
At this point you will see a asking you to configure disks. Click manual and then continue and you will see this screen (left).
The middle section is a list of all recognized storage drives. If you have already configured your partition, skip this next part.
Click on the partition you created in step 6 and click continue.
If you reach a screen asking you to create a new partition table, click yes if you are using Kali by itself, no if you are dual-booting then click continue.
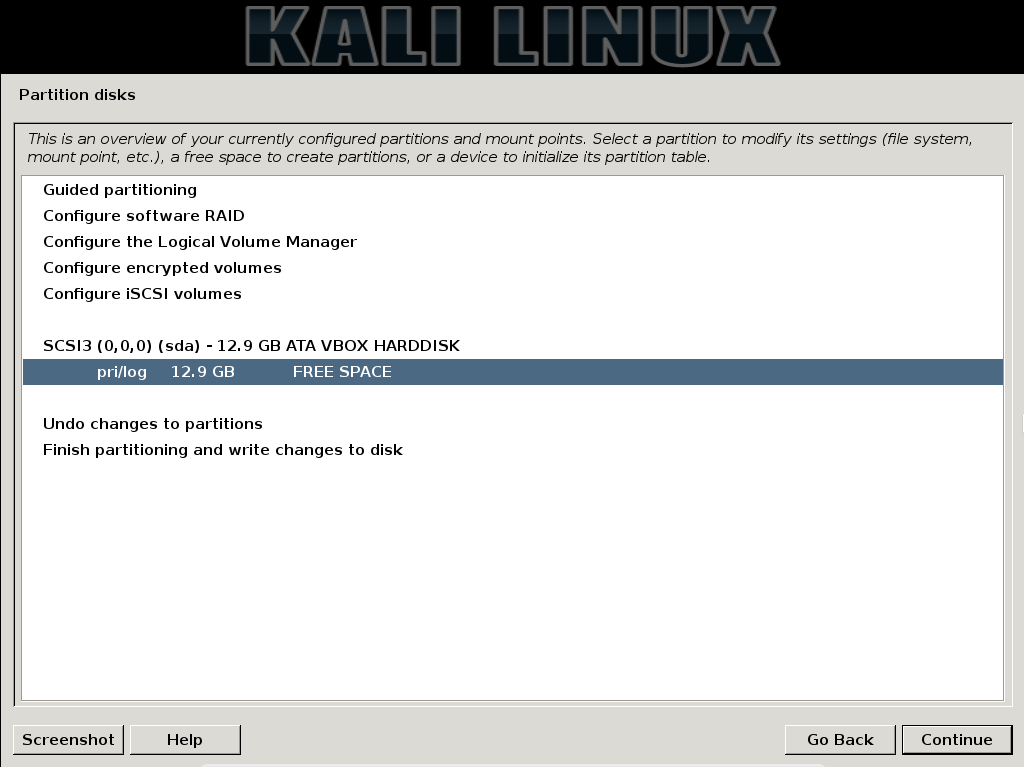
On the next screen, you will see a list of all devices and partitions, including your created partition, or FREE SPACE if you are installing on a single OS computer. Click on the desired partition and click continue.
If you are asked to create a new partition, simply point and click through the wizard until you see this next screen:
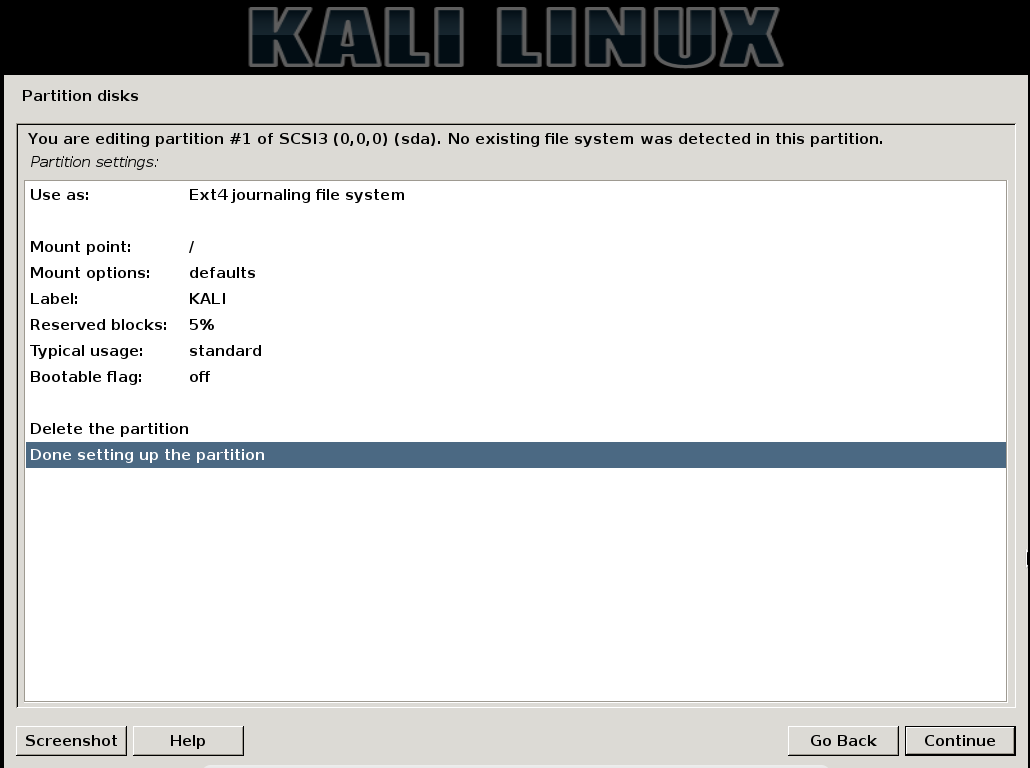
On this screen, make sure it is set to Ext4 journaling file system. Set the mount point to / and label it something. Click “Done setting up the partition” and Continue to move on to the next step.
This will take you to the previous screen, with your new partition. Verify it is correct, then select “Finish partitioning…” and click Continue.
You will be prompted with a screen requesting you to make a swap partition. Click NO and continue. On the next screen, it will confirm that the changes be written to the disk. Click YES and Continue. Shortly after this, it will install the system to the HDD. Simply point and click through the remainder of the wizard, and when it is installed, simply reboot. Take care to remove the USB drive first.
Note — After install, if Kali doesn’t appear in the GRUB bootloader for your current system, open your current Linux system and issue the following command:
sudo update-grub