For years, I’ve been roaming the web trying to find a good, free way to host my personal website. I’m a cheapskate, so I really didn’t want to pay for it…
After trying numerous “free tiers,” sketchy shared-hosting services, and overly-complicated free cloud options, I finally settled on what I consider to be the ultimate, secure, and free (as in cookies, and as in Freedom) hosting solution: GitHub pages + CloudFlare. In this tutorial, we’ll take a look at how to set it up.
Step 0: Prerequisites
0.1 — You need a website.
](https://cdn-images-1.medium.com/max/2224/1*OZfWkxG6qE3CSzCqwf9EiA.png)
The first step in all of this, of course, is to actually have a website to host. So, create your personal website using good ole-fashioned static web development (HTML/CSS/JS/etc).
My site is a simple, one page Bootstrap ordeal. Save for Bootstrap and jQuery, it has only 4 lines of JavaScript.
0.2 — Get a custom domain name (optional).
While it’s not required, having a custom domain name makes your online presence seem somehow more… official. You can get .com domain names for super cheap from sites like Google Domains.
Step 1: Setting Up GitHub Pages
GitHub has an awesome free static hosting service called GitHub Pages. Essentially, it allows you to push your static site to a repository and GitHub will automatically host that site for free. forever. The only potential downside is that the source-code for your website will be available for anyone to view.
1.1 — Sign-in to GitHub and create a repo.
For the purposes of this tutorial, I’m going to assume you know how Git & GitHub work.
Sign in to GitHub, and create a new repository. This repo must be named in a special way to enable GitHub Pages. It must take the following form:
<your github username>.github.io
So mine, for example, is called glmdev.github.io. This tells GitHub to activate GitHub pages. Now, on your local machine, add the repository as a remote and push your code to the master branch.
1.2 — Force clients to use HTTPS. (optional, but not really…)
If you’re using a custom domain, this is not for you.
If you’re not using a custom domain, you’re technically done at this point. You have a working static website. But, in the name of best practice, we are going to redirect non-secure clients to the HTTPS protocol by default.
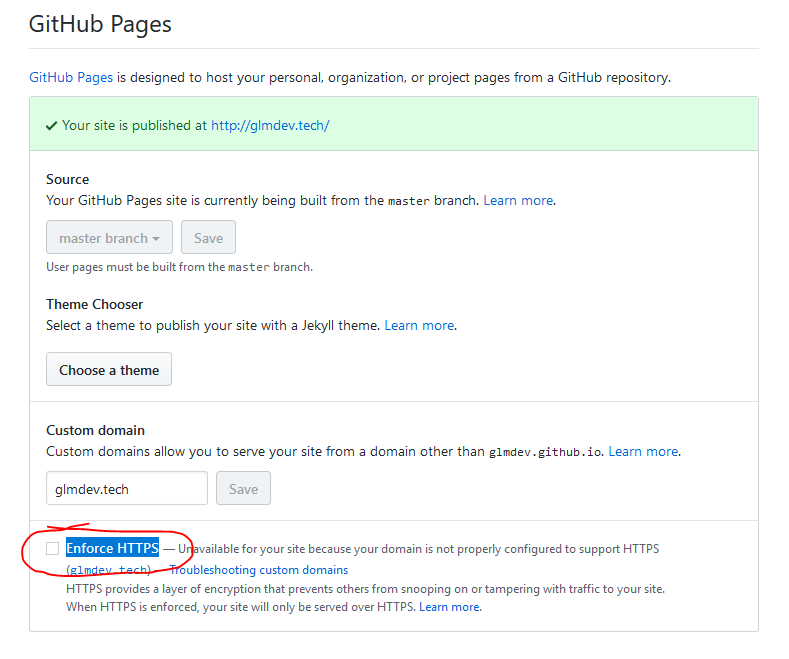
This can be done by going to the repository settings page, scrolling down to the GitHub pages section, and checking the “Enforce HTTPS” box.
By default, GitHub provides free SSL certificates for their *.github.io domains.
That’s it! If you don’t have a custom domain, you’re done. Congrats, and happy interneting!
Step 2: Setting Up CloudFlare
CloudFlare is an amazing, free service that provides web caching, always-on, and SSL enforcement for websites. It also has a host of other features that you can tinker with. So, we’re going to be setting up CloudFlare to use with our custom domain.
2.1 — Create a CloudFlare account.
Head over to CloudFlare and sign up for an account, then click the add site button. Put in your custom domain name here.
CloudFlare will then probe your existing DNS settings to try to import them. It’s important that you sign-in to your registrar and add any other DNS records you have (like MX mail records and TXT records) because after the setup, all DNS queries to your domain will run through the CloudFlare servers, not your registrar.
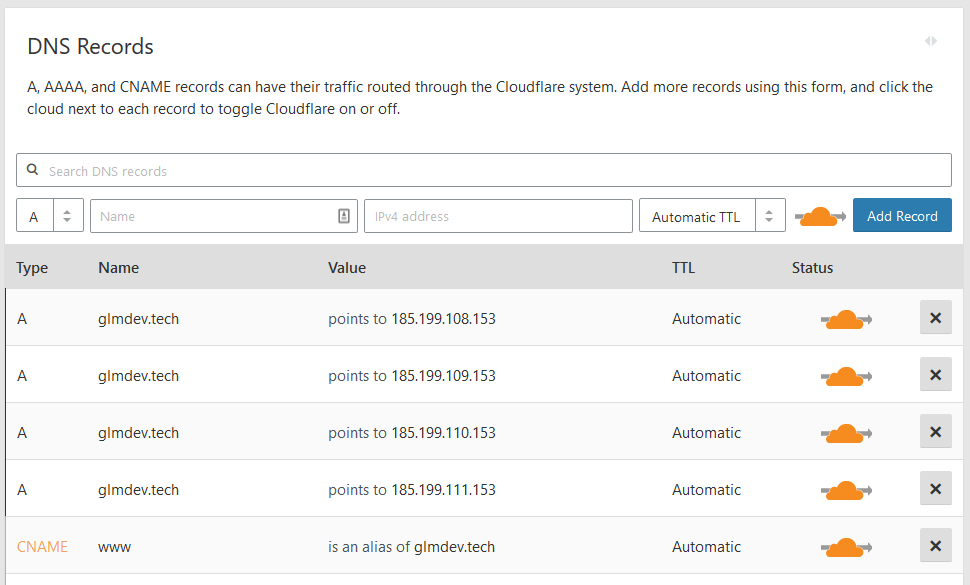
At this point, you should also add GitHub’s root IP addresses as A records to your domain. This will allow visitors to your domain to access the Pages site. I also added a simple CNAME record pointing the www. version of my site back to the root domain. The GitHub A records are:
185.199.108.153
185.199.109.153
185.199.110.153
185.199.111.153
2.2 — Configure your domain’s nameservers.
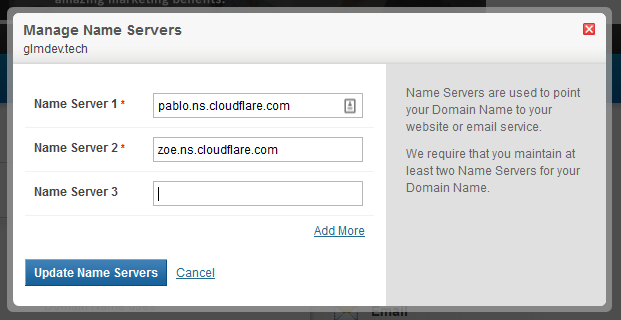
After you add the DNS records, you’ll be given the addresses of 2 CloudFlare nameservers to point your domain to. These will take the place of your registrar’s default servers.
Sign in to your registrar and click the settings for your domain’s nameservers. Then, replace the registrar’s default ones with the addresses CloudFlare gave you.
2.2 — Now the hardest part.
This part is the kicker. Because DNS is decentralized, you may have to wait up to 48 hours for the changes to propagate before you can finish setting up your domain. You can use a DNS checker to see if your domain’s A records now point to a CloudFlare IP address, but even then it may take several more hours.
Step 3: Add the Custom Domain to GitHub Pages
Once your DNS settings have propagated, you can tell GitHub to use the custom domain instead of the free .github.io one.
3.1 — Create the CNAME file.
To do this, create a file in the root of your repository called CNAME, then put the custom domain(s) in the file, one per line, like so:
glmdev.tech
www.glmdev.tech
Commit and push the file, then give GitHub a second to rebuild the site, and then you should be able to load your website at the custom domain.
3.2 — Enable SSL redirection. (optional, but again, not really…)
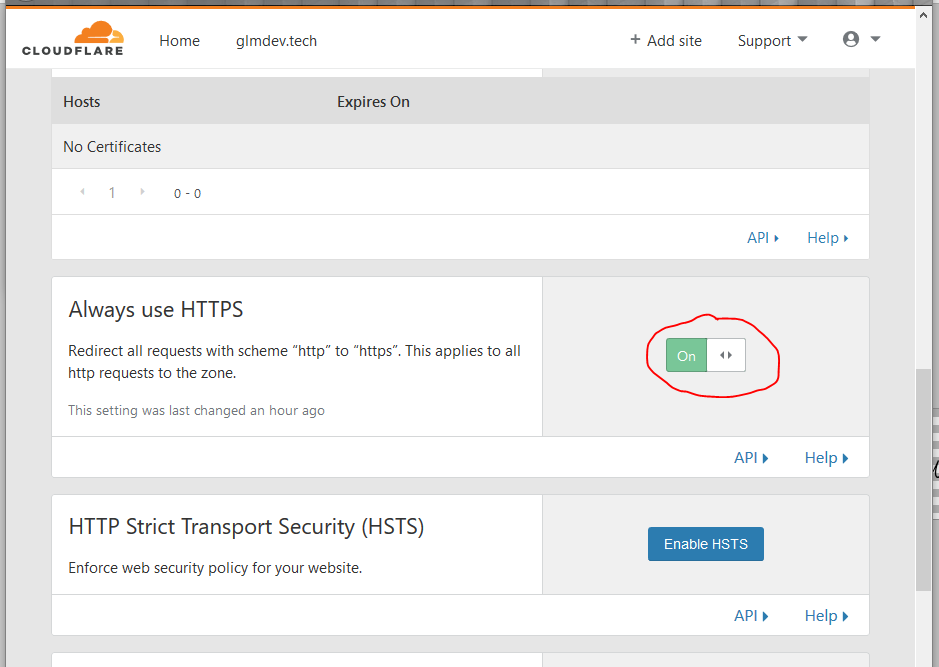
Lastly, we want non-secure HTTP clients to be automatically redirected to the HTTPS protocol whenever they can. To enable this, go to the CloudFlare dashboard, click the Crypto tab, and turn on “Always Use HTTPS.” While you’re at it, because GitHub also supports SSL, change the SSL mode at the top of the page from “Flexible” to “Full.”
Conclusion
That’s it! Not terribly painful, actually, and we have a kick-ass free (and secure) website up and running.
A few things of note:
CloudFlare is really powerful. It can do a lot more than I covered in this tutorial, and I’d suggest tinkering around with it to really get the most out of the free service.
When you want to update/change your website, all you need to do is push the changes to the GitHub pages repository, and they’ll automatically be updated on the live site.
Any new DNS records you may add to your domain should be added from within the CloudFlare DNS panel, not via your registrar.
Lastly, if you don’t already make it a habit, I suggest going to your GitHub and CloudFlare account settings and enabling 2-Factor Authentication.