Part I — The Basics
This is Part 1 in my series on building an HPC-style Raspberry Pi cluster. Check out Part 2 and Part 3.
As a new project of mine, I’ve decided to build a miniature community-style cluster using Raspberry Pi computers and HPC-grade software. When I set out to do this, I discovered that instructions on setting this up are actually surprisingly sparse. So, I decided to document my progress in a series of guides. In this Part I, we will look at the basics of setting up the hardware and getting a cluster scheduler running.
Step 0: Get The Hardware
Parts list
3x Raspberry Pi 3 Model B — for the compute nodes
1x Raspberry Pi 3 Model B — for the master/login node
4x MicroSD Cards
4x micro-USB power cables
1x 8-port 10/100/1000 network switch
1x 6-port USB power-supply
1x 64GB USB Drive (or NAS, see below)
This project is scalable to as many RPis (and even non-RPi computers) of different kinds as you want, but for my cluster, I used 3 Pis with MicroSD cards of varying capacities connected to my network through an 8-port gigabit switch.
Let’s talk storage. Cluster computing requires a storage location that is shared across all of the different nodes so they can work on the same files as the jobs are farmed out. For a basic setup, you can use a 64GB USB drive plugged in to one of the Pis as shared storage (or a larger Micro SD card in one of them). However, as an alternative, if you have some kind of network-attached storage that you can export as an NFS share, this can also be used as the shared drive.
For example, I have about 750GB of btrfs RAID storage on a Linux box on my network. Instead of using a 64GB flash drive, I just exported an NFS share from this and mounted it on all the nodes. (Don’t worry, we’ll cover both.)
Step 1: Flash the Raspberry Pis
The first step is to get our Pis up and running. Start by downloading the latest version of Raspbian, the Debian distribution that runs on the Pis. Download the command-line only “lite” version to save space: Download Here.
Now, download and install Etcher. Etcher is a simple program that we will use to write the downloaded Raspbian image to our SD cards. Get Etcher here.
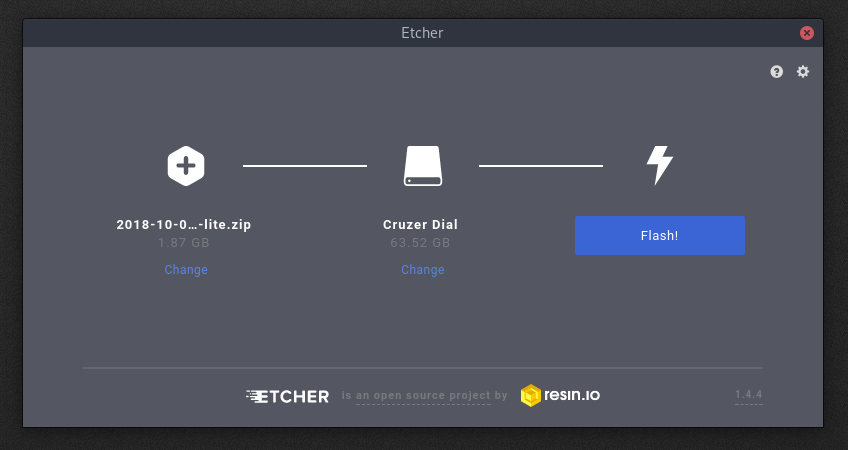
Fire up Etcher and plug in your MicroSD card (use an adapter).
Select the Raspbian ZIP file and hit flash.
Before we finish with the SD card, we want to enable SSH remote access from our Pi. To do this, open the “boot” drive on the SD card and create an empty file named ssh with no extension. On Windows, you can do this by opening Notepad and saving the blank file with no extension. On macOS and Linux, open the folder in a shell and run:
glmdev@polaris ~> touch ssh
Wash, rinse, and repeat this for the other 3 MicroSD cards. Once you’ve done this, plug the SD cards into the 4 nodes.
Step 2: Network Setup
We want to make sure that our nodes have IP addresses that never change. This way, we can be sure that they can always talk to each other, which is critical for the cluster jobs.
I recommend setting the Pis up one at a time so you can keep track of which physical node is has what IP. This makes maintenance easier.
Start by plugging the switch into your network. Then, connect one Pi to the switch and plug it in. Wait a second for it to boot up.
Once the Pi has booted, we can SSH into it to finish setting it up. To find the IP address of the Pi, either use your router’s interface to view attached devices. If you can’t do this, use a program like nmap to scan IP addresses on your network. Either way, look for a device named RASPBERRYPI and make a note of its IP address.
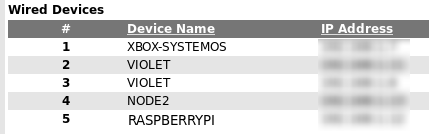 Find the RASPBERRYPI device’s IP address.
SSH into the Pi using:
ssh pi@ip.addr.goes.here
(default password: raspberry)
Step 3: Set Up the Raspberry Pis
3.1: raspi-config
Now we can start setting up the Pi. First, get some basic config out of the way:
pi@raspberrypi~$ sudo raspi-config
This will open the config utility. Change the default password, set the locale and timezone, and expand the filesystem. Then, exit the utility.
3.2: setting the hostname
A word about hostnames: SLURM, the cluster scheduler we will be using, expects hosts to be named following a specific pattern:
. So, when choosing hostnames for your RPis, it’s helpful to pick a system and number them in order (eg node01, node02, node03, node04, etc…).
Now, set the hostname:
sudo hostname node01       # whatever name you chose
sudo nano /etc/hostname    # change the hostname here too
sudo nano /etc/hosts       # change "raspberrypi" to "node01"
We use the systemd hostname command, edit the hostname file, and update the hosts file so local resolution works.
3.3: make sure the system time is right
The SLURM scheduler and the Munge authentication that it uses requires accurate system time. We’ll install the ntpdate package to periodically sync the system time in the background.
sudo apt install ntpdate -y
3.4: reboot
sudo reboot
Repeat this process on all of the RPis.
Step 4: Shared Storage
A word on shared storage: In order for a cluster to work well, a job should be able to be run on any of the nodes in the cluster. This means that each node needs to be able to access the same files. We will accomplish this by connecting a 64GB USB drive connected to the master node (more on that below) and exporting that drive as a network file system (NFS). Then, we can mount that NFS share on all the nodes so they can all share access to it. Side note: If, like me, you have a separate NAS box on your network that you would rather use as shared storage, you can export an NFS share from that box. Then, just mount that share on the nodes using the instructions below.
4.0: Login to the Master Node
We will discuss the master node more later, but one of our nodes will be the controller. Just pick one. :) In my cluster, the master is node01.
ssh pi@<ip addr of node01>
4.1: Connect & Mount Flash Drive
**4.1.1: Find the drive identifier. **Plug the flash drive into one of the USB ports on the master node. Then, figure out its dev location by examining the output of lsblk:
glmdev@node01 ~> lsblk
NAME        MAJ:MIN RM  SIZE RO TYPE MOUNTPOINT
mmcblk0     179:0    0  7.4G  0 disk
├─mmcblk0p1 179:1    0 43.8M  0 part /boot
└─mmcblk0p2 179:2    0  7.4G  0 part /
sda         8:16     0 59.2G  0 disk
└─sda1      8:17     0 59.2G  0 part
In this case, the main partition of the flash drive is at /dev/sda1.
**4.1.2: Format the drive. **We’re first going to format the flash drive to use the ext4 filesystem:
sudo mkfs.ext4 /dev/sda1
**A word of warning: **double check to be sure you’re not about to overwrite your root / directory on accident.
4.1.3: Create the mount directory. (Note that this should be the same across all the nodes.) In my cluster, I used /clusterfs:
sudo mkdir /clusterfs
sudo chown nobody.nogroup -R /clusterfs
sudo chmod 777 -R /clusterfs
**4.1.4: Setup automatic mounting. **To mount our flash drive on boot, we need to find the UUID. To do this, run blkid and make note of the UUID from /dev/sda1 like so:
UUID="65077e7a-4bd6-47ea-8014-01e06655cc31"
Now, edit fstab to mount the drive on boot.
sudo nano /etc/fstab
Add the following line:
UUID=65077e7a-4bd6-47ea-8014-01e06655cc31 /clusterfs ext4 defaults 0 2
Finally, mount the drive with sudo mount -a.
**4.1.5: Set loose permissions. **Because use of our cluster will be pretty supervised, we can set loose permissions on the mounted drive:
sudo chown nobody.nogroup -R /clusterfs
sudo chmod -R 766 /clusterfs
4.2: Export the NFS Share
Now, we need to export the mounted drive as a network file system share so the other nodes can access it. Do this process on the master node.
4.2.1: Install the NFS server.
sudo apt install nfs-kernel-server -y
4.2.2: Export the NFS share.
Edit /etc/exports and add the following line:
/clusterfs <ip addr>(rw,sync,no_root_squash,no_subtree_check)
Replace
/clusterfs 192.168.1.0/24(rw,sync,no_root_squash,no_subtree_check)
rw gives the client Read-Write access, sync forces changes to be written on each transaction, no_root_squash enables the root users of clients to write files as root permissions, and no_subtree_check prevents errors caused by a file being changed while another system is using it.
Lastly, run the following command to update the NFS kernel server:
sudo exportfs -a
4.3: Mount the NFS Share on the Clients
Now that we’ve got the NFS share exported from the master node, we want to mount it on all of the other nodes so they can access it. Repeat this process for all of the other nodes.
4.3.1: Install the NFS client.
sudo apt install nfs-common -y
4.3.2: Create the mount folder. This should be the same directory that you mounted the flash drive to on the master node. In my case, this is /clusterfs:
sudo mkdir /clusterfs
sudo chown nobody.nogroup /clusterfs
sudo chmod -R 777 /clusterfs
4.3.3: Setup automatic mounting. We want the NFS share to mount automatically when the nodes boot. Edit /etc/fstab to accomplish this by adding the following line:
<master node ip>:/clusterfs /clusterfs nfs defaults 0 0
Now mount it with sudo mount -a and you should be able to create a file in /clusterfs and have it show up at the same path across all the nodes.
Step 5: Configure the Master Node
A word on schedulers and SLURM: It may be overkill for a personal cluster, but most Linux clusters use a piece of software called a scheduler. A scheduler accepts jobs and, when nodes become available, it runs them on the next available set of nodes. This allows us to keep submitting jobs and they will be processed as resources become available. We will be using a scheduler called SLURM on our cluster. SLURM runs a control daemon on one or more master nodes, then farms out jobs to other nodes. One of our RPis will be a dedicated login & master node, and will not process jobs. What’s a login node? It’s the RPi you ssh into to use the cluster.
5.0: Login to the Master Node
Pick one of your nodes to be the dedicated master, and ssh into it. In my cluster, this is node01.
ssh pi@<ip addr of node01>
5.1: /etc/hosts
To make resolution easier, we’re going to add hostnames of the nodes and their IP addresses to the /etc/hosts file. Edit /etc/hosts and add the following lines:
<ip addr of node02>      node02
<ip addr of node03>      node03
<ip addr of node04>      node04
5.2: Install the SLURM Controller Packages
sudo apt install slurm-wlm -y
5.3: SLURM Configuration
We’ll use the default SLURM configuration file as a base. Copy it over:
cd /etc/slurm-llnl
cp /usr/share/doc/slurm-client/examples/slurm.conf.simple.gz .
gzip -d slurm.conf.simple.gz
mv slurm.conf.simple slurm.conf
Then edit /etc/slurm-llnl/slurm.conf.
5.3.1: Set the control machine info. Modify the first configuration line to include the hostname of the master node, and its IP address:
SlurmctldHost=node01(<ip addr of node01>)
# e.g.: node01(192.168.1.14)
5.3.2: Customize the scheduler algorithm. SLURM can allocate resources to jobs in a number of different ways, but for our cluster we’ll use the “consumable resources” method. This basically means that each node has a consumable resource (in this case, CPU cores), and it allocates resources to jobs based on these resources. So, edit the SelectType field and provide parameters, like so:
SelectType=select/cons_res
SelectTypeParameters=CR_Core
**5.3.3: Set the cluster name. **This is somewhat superficial, but you can customize the cluster name in the “LOGGING AND ACCOUNTING” section:
ClusterName=glmdev
5.3.4: Add the nodes. Now we need to tell SLURM about the compute nodes. Near the end of the file, there should be an example entry for the compute node. Delete it, and add the following configurations for the cluster nodes:
NodeName=node01 NodeAddr=<ip addr node01> CPUs=4 State=UNKNOWN
NodeName=node02 NodeAddr=<ip addr node02> CPUs=4 State=UNKNOWN
NodeName=node03 NodeAddr=<ip addr node03> CPUs=4 State=UNKNOWN
NodeName=node04 NodeAddr=<ip addr node04> CPUs=4 State=UNKNOWN
5.3.5: Create a partition. SLURM runs jobs on ‘partitions,’ or groups of nodes. We’ll create a default partition and add our 3 compute nodes to it. Be sure to delete the example partition in the file, then add the following on one line:
PartitionName=mycluster Nodes=node[02-04] Default=YES MaxTime=INFINITE State=UP
5.3.6: Configure cgroups Support The latest update of SLURM brought integrated support for cgroups kernel isolation, which restricts access to system resources. We need to tell SLURM what resources to allow jobs to access. To do this, create the file /etc/slurm-llnl/cgroup.conf:
CgroupMountpoint="/sys/fs/cgroup"
CgroupAutomount=yes
CgroupReleaseAgentDir="/etc/slurm-llnl/cgroup"
AllowedDevicesFile="/etc/slurm-llnl/cgroup_allowed_devices_file.conf"
ConstrainCores=no
TaskAffinity=no
ConstrainRAMSpace=yes
ConstrainSwapSpace=no
ConstrainDevices=no
AllowedRamSpace=100
AllowedSwapSpace=0
MaxRAMPercent=100
MaxSwapPercent=100
MinRAMSpace=30
Now, whitelist system devices by creating the file /etc/slurm-llnl/cgroup_allowed_devices_file.conf:
/dev/null
/dev/urandom
/dev/zero
/dev/sda*
/dev/cpu/*/*
/dev/pts/*
/clusterfs*
Note that this configuration is pretty permissive, but for our purposes, this is okay. You could always tighten it up to suit your needs.
5.4: Copy the Configuration Files to Shared Storage
In order for the other nodes to be controlled by SLURM, they need to have the same configuration file, as well as the Munge key file. Copy those to shared storage to make them easier to access, like so:
sudo cp slurm.conf cgroup.conf cgroup_allowed_devices_file.conf /clusterfs
sudo cp /etc/munge/munge.key /clusterfs
A word about Munge: Munge is the access system that SLURM uses to run commands and processes on the other nodes. Similar to key-based SSH, it uses a private key on all the nodes, then requests are timestamp-encrypted and sent to the node, which decrypts them using the identical key. This is why it is so important that the system times be in sync, and that they all have the munge.key file.
5.5: Enable and Start SLURM Control Services
Munge:
sudo systemctl enable munge
sudo systemctl start munge
The SLURM daemon:
sudo systemctl enable slurmd
sudo systemctl start slurmd
And the control daemon:
sudo systemctl enable slurmctld
sudo systemctl start slurmctld
5.6: Reboot. (optional)
This step is optional, but if you are having problems with Munge authentication, or your nodes can’t communicate with the SLURM controller, try rebooting it.
Step 6: Configure the Compute Nodes
6.1: Install the SLURM Client
sudo apt install slurmd slurm-client -y
6.2: /etc/hosts
Update the /etc/hosts file like we did on the master node. Add all of the nodes and their IP addresses to the /etc/hosts file of each node, excluding that node. Something like this:
node02:/etc/hosts
<ip addr>    node01
<ip addr>    node03
<ip addr>    node04
6.3: Copy the Configuration Files
We need to make sure that the configuration on the compute nodes matches the configuration on the master node exactly. So, copy it over from shared storage:
sudo cp /clusterfs/munge.key /etc/munge/munge.key
sudo cp /clusterfs/slurm.conf /etc/slurm-llnl/slurm.conf
sudo cp /clusterfs/cgroup* /etc/slurm-llnl
6.4: Munge!
We will test that the Munge key copied correctly and that the SLURM controller can successfully authenticate with the client nodes.
6.4.1: Enable and start Munge.
sudo systemctl enable munge
sudo systemctl start munge
**6.4.2: Test Munge. **We can manually test Munge to see if it is communicating. Run the following to generate a key on the master node and try to have the client node decrypt it. (Run this on the client.)
ssh pi@node01 munge -n | unmunge
If it works, you should see something like this:
pi@node02 ~> ssh node01 munge -n | unmunge
pi@node01's password:
STATUS:           Success (0)
ENCODE_HOST:      node01
ENCODE_TIME:      2018-11-15 15:48:56 -0600 (1542318536)
DECODE_TIME:      2018-11-15 15:48:56 -0600 (1542318536)
TTL:              300
CIPHER:           aes128 (4)
MAC:              sha1 (3)
ZIP:              none (0)
UID:              pi
GID:              pi
LENGTH:           0
If you get an error, make sure that the /etc/munge/munge.key file is the same across all the different nodes, then reboot them all and try again.
6.5: Start the SLURM Daemon
sudo systemctl enable slurmd
sudo systemctl start slurmd
Complete this configuration on each of the compute nodes.
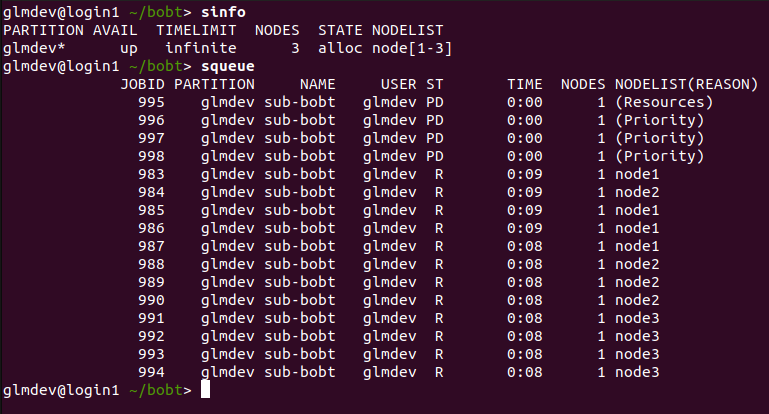
Step 7: Test SLURM
Now that we’ve configured the SLURM controller and each of the nodes, we can check to make sure that SLURM can see all of the nodes by running sinfo on the master node (a.k.a. “the login node”):
PARTITION    AVAIL  TIMELIMIT  NODES  STATE NODELIST
mycluster*      up   infinite      3   idle node[02-04]
Now we can run a test job by telling SLURM to give us 3 nodes, and run the hostname command on each of them:
srun --nodes=3 hostname
If all goes well, we should see something like:
node02
node03
node04
Going Forward
We now have a functional compute cluster using Raspberry Pis! You can now start submitting jobs to SLURM to be run on however many nodes you want. I’ll have a crash-course on SLURM in the future, but for now you can find a good overview in the documentation here.
You may notice that the cluster can’t really do much yet. In Part II of this guide, we’ll take a look at setting up some software and parallel computing on our mini-cluster.
— Garrett
A Word on Troubleshooting
These guides are designed to be followed in a top-down sequential order. If you’re having problems with a command, feel free to leave a comment below with the exact number of the step you are stuck on, and I’ll try to answer if I can.
Note: This guide was updated on July 22nd, 2019 to reflect changes to Raspbian Buster and SLURM config options.