Setting Up Spacewalk Channels - Part II
This is part 2 in my series of articles on how to use Spacewalk to manage Linux clients.
RedHat Satellite, and by extension Spacewalk, uses a system of channels to organize the software and configuration available to registered systems. In fact, those are the two main types of channels: software and configuration. Software channels contain a collection of repositories and packages that are made available to systems subscribed to that channel. Configuration channels contain a number of centrally-managed configuration files that can be deployed to systems registered in that channel.
In this guide, we’ll look at basic setup of each type.
Software channels are particularly useful for managing groups of similar computers for a number of reasons. First, it allows you to dynamically control what repositories the machines pull software from, without having to configure the individual machines. Second, because Spacewalk caches a local copy of the repositories in each channel (and can sync it regularly), it can greatly reduce bandwidth usage. Instead of 100 machines each downloading the same updates directly, Spacewalk downloads them once and each of the 100 machines just retrieves them from Spacewalk.
Configuration channels are similarly useful for groups of similar machines. Configuration files can be added and versioned in the Spacewalk interface, then deployed to registered machines. This guarantees that all the machines in a given group have the same configuration for things like SSH, Apache2, SSSD, PAM, bashrc, profile.d, cron.daily, and whatever else.
In this guide, we’ll look at setting up software channels to manage a group of CentOS 7 machines, but this can be adapted to work for any RPM or DEB distribution.
Creating Software Channels
Create a Base Channel
Sign in to the Spacewalk web portal. Then, navigate to Channels > Manage Software Channels > Create Channel. Fill in the channel name and label (these are usually the same) and the summary. Then, click Create Channel.
We’re going to start off by creating a base channel for CentOS 7 machines.

Add the Repositories
Next, we’ll add the CentOS7 base repositories to our channel. Navigate to Manage Repositories > Create Repository. Fill in the repository label, repository URL, and select the repository type. For example, for the CentOS7 os repository:
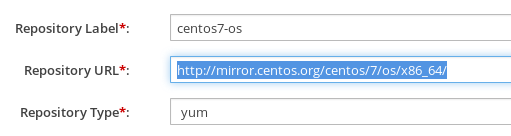
Note: The repository URL should be the location that contains the repodata directory.
In this example, I repeated this process to add the CentOS7 extras and updates repositories, which have similar repository URLs.
Assign Repositories to the Channel
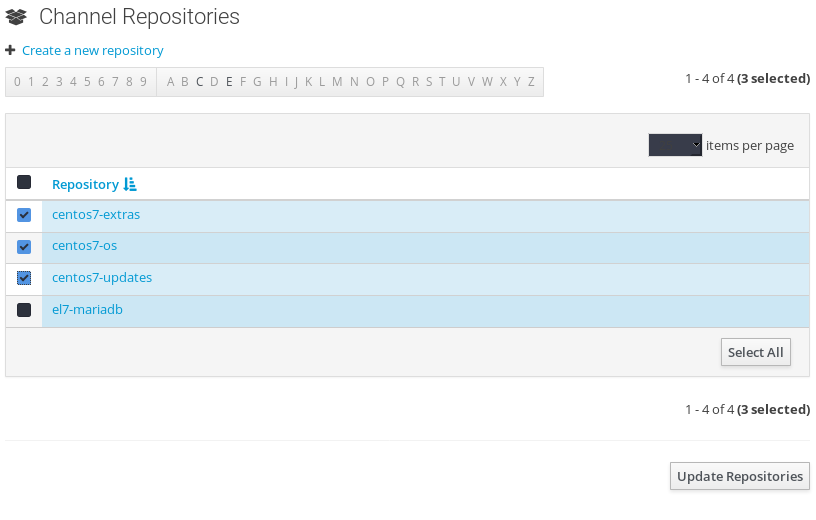
We need to tell the base channel we created to use the repositories we just added. To do this, navigate to Channels > Manage Software Channels > channel name > Repositories. Here, select the repositories we just added and click Update Repositories.
Create a Child Channel
We’re also going to create a child channel. This channel will fall under the base CentOS 7 channel we created, but it will provide additional repositories and software. Which is to say, machines registered to our child channel will have access to the software provided by both the parent and child channels’ repositories. As an example, we’re going to create a channel that provides the MariaDB repositories for CentOS 7. To do this, basically repeat the same process.
Navigate to Channels > Manage Software Channels > Create Channel. Provide a channel name, label, and summary. This time, in the Parent Channel drop-down, select the centos7-base channel we created earlier. This will establish the new channel as a child of that channel.
Add the Repository
Navigate to Channels > Manage Software Channels > Manage Repositories > Create Repository. Provide the name, URL, and type of the MariaDB repository.
In our example, we used the following:
Repository name: el7-mariadb Repository URL: http://yum.mariadb.org/10.3/centos7-amd64/ Repository type: yum
Assign the Repository to the Channel
Navigate to Channels > Manage Software Channels > child channel name > Repositories. Select the MariaDB repository we just added, and click Update Repositories.
Syncing Repository Packages
Spacewalk caches local copies of all the packages for the repositories we add. This allows it to offer those packages to registered clients with lower internet bandwidth costs, especially across larger deployments. Since all of our CentOS 7 clients will already have access to the main repositories, we won’t bother caching the entirety of the CentOS mirror for this example (though if you wish to do so, the process below is the same). We will, however, sync the much smaller MariaDB repository so our clients can access its packages.
To do this, navigate to Channels > Manage Software Channels > MariaDB channel > Repositories > Sync > Sync Now. This will manually start downloading and indexing the packages from the repositories. On the same page, you can create a schedule to automatically sync the repositories.
Note: ** This will take a while, even if the repository is relatively small. One way to view the progress of the sync process is by navigating to /var/sattelite/redhat/1/stage on the Spacewalk host. The stage folder is where Spacewalk downloads the packages to before it sorts them to other folders in the 1 directory (where 1 is the ID of the Spacewalk group in question). You can roughly gauge the sync process by seeing how many packages are in this folder.
When the sync process finishes, you should be able to view all the repository’s packages by navigating to Channels > Manage Software Channels > MariaDB channel > Packages > List / Remove Packages.
Note: One thing to consider when syncing repositories is how much space they will require. By default, CentOS 7, which is the OS we set up Spacewalk on, provides a much smaller root directory partition than /home partition. Make sure the repositories you are syncing can fit in the allotted partition, or use custom partitioning in the CentOS install.
Creating Configuration Channels
Similar to software channels, Spacewalk uses configuration channels to make custom configuration files available to clients subscribed to that channel. These configuration files can be pushed to the clients from the Spacewalk control panel. In this example, we’ll create a configuration channel with a fake configuration file, /root/test.conf.
Create the Configuration Channel
Navigate to Configuration > Configuration Channels > Create Config Channel. Give the channel a name, label, and brief description.
Add the Configuration File
To add the test configuration file, navigate to Configuration > Configuration Channels > test channel > Add Files > Create File. Give the file a fully-qualified filename. That is, /root/test.conf. You can change the file owner and permissions, then fill in the contents in the text field below.
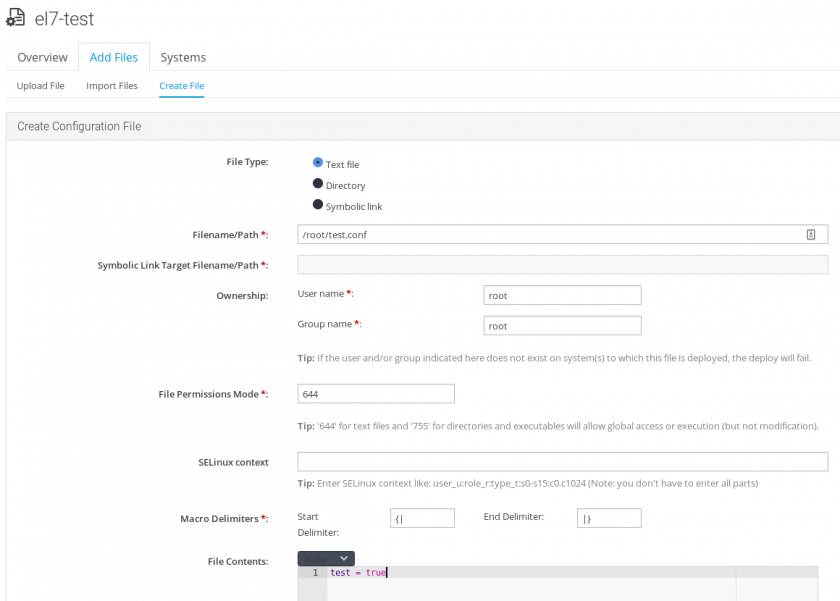
Then click Create Configuration File. Spacewalk will save the configuration file. You’ll notice that it drops you on a page called “Revision 1 of /root/test.conf.” This is because Spacewalk will allow you to revise your configuration files and it will track the changes. You can deploy different revisions to different hosts.
Learn from my mistakes:* By default, adding an external repository to a channel (like the MariaDB repository) doesn’t add its GPG key to the registered hosts. This means that, without providing the GPG key to the clients, they will be unable to install the software. We’ll cover this in the Registering Clients section, but this can be done by pushing the GPG key via a configuration channel to /etc/pki/rpm-gpg and importing it via rpm. Alternatively, add the GPG key in the child channel’s settings when it is created.*