Registering Spacewalk Clients - Part III
This series is based on a collection of articles on my personal knowledge-base about how to use Spacewalk to manage Linux systems.
Now that we’ve set up Spacewalk server and created some software and configuration channels, we can register clients against the server and set them up to be managed by Spacewalk. This is done by creating an activation key in the Spacewalk server, installing the client services on the remote machines, then using the activation key to register them.
Create an Activation Key
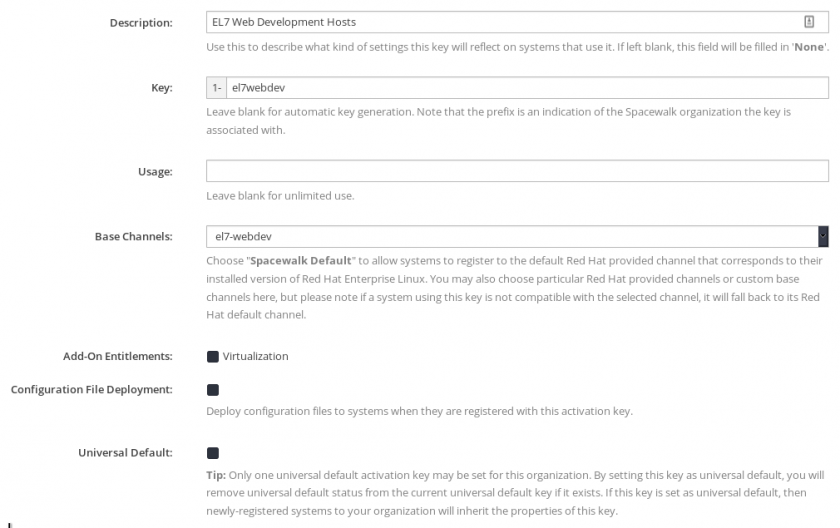
Log in to the Spacewalk administration panel and navigate to Systems > Activation Keys > Create Key. Give your key a description, key-code for remote systems (this will be used to register them), select the base channel for systems registered with the key, and (optionally) limit the number of times the key can be used. If you leave the “Usage” box blank, the key can be used to register an unlimited number of systems.
Customize Activation Key Packages
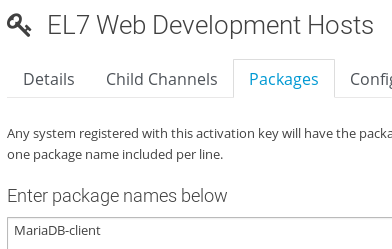
You can configure Spacewalk to automatically install a list of packages on clients when they are registered with a given activation code. You can configure this by navigating to **Systems > Activation Keys > key name > Packages **and entering a list of package names with one package per line. These packages should be available in the channels with which the activation key is associated.
You can also customize the child channel that the systems will join by navigating to Systems > Activation Keys > key name > Child Channels and selecting it there.
Register Client Systems
Now that we have software and configuration channels created and registered with an activation key, we can register client systems to be managed by the Spacewalk server.
Prerequisites (EL7)
The Spacewalk client packages have dependencies in the EPEL repositories. Install those:
# yum install epel-release -y
Next, install the EL7 Spacewalk client repository:
# rpm -Uvh https://copr-be.cloud.fedoraproject.org/results/@spacewalkproject/spacewalk-2.9/epel-7-x86_64/00830557-spacewalk-repo/spacewalk-client-repo-2.9-4.el7.noarch.rpm
Finally, install the required client packages:
# yum install -y rhn-client-tools rhn-check rhn-setup rhnsd m2crypto yum-rhn-plugin osad rhncfg-actions rhncfg-management
Prerequisites (Fedora)
Install the Fedora Spacewalk client repository:
# dnf copr enable @spacewalkproject/spacewalk-2.9-client
Install the required client packages:
# dnf -y install rhn-client-tools rhn-check rhn-setup rhnsd m2crypto dnf-plugin-spacewalk osad rhncfg-actions rhncfg-management
For the interested: rhncfg-actions and rhncfg-management are daemons that allow Spacewalk to manage configuration files osad is a real-time messaging daemon that Spacewalk uses to communicate with the host yum-rhn-plugin is a plugin for YUM that allows Spacewalk to dynamically manage the repositories it has access to m2crypto is a Python wrapper for OpenSSL that secures communications between Spacewalk clients and the server rhnsd and rhn-check are tools and background services that polls the Spacewalk server to check for new actions rhn-client-tools and rhn-setup provide the core functionality of Spacewalk management and setup processes
Install the Spacewalk Server CA Certificate
Spacewalk uses a self-signed SSL certificate to communicate with the registered clients. This prevents 3rd-parties from intercepting and modifying Spacewalk communications. To allow Spacewalk to manage the clients, we need to install the Spacewalk server’s certificate authority. This can be done two ways.
Copy the CA file manually (not recommended):
# scp root@*spacewalk.server.url*:/root/ssl-build/RHN-ORG-TRUSTED-SSL-CERT /usr/share/rhn/RHN-ORG-TRUSTED-SSL-CERT
Install the generated CA package (recommended):
# rpm -Uvh http://*spacewalk.server.url*/pub/rhn-org-trusted-ssl-cert-1.0-1.noarch.rpm
Register the Spacewalk Clients
We can now register the client against Spacewalk server. Depending on how many packages your activation key specifies to install, this may take a while.
# rhnreg_ks --activationkey="1-*yourkeyhere*" --serverUrl=http://*spacewalk.server.url*/XMLRPC --sslCACert=/usr/share/rhn/RHN-ORG-TRUSTED-SSL-CERT
Learn from my mistakes: Spacewalk server supports multiple organizations per server. As such, it prefixes each activation key with the ID number of the organization. In most cases (i.e. if you’re only using Spacewalk with one organization), this ID number is “1”. Hence, you need to prefix the activation code you created with 1- to specify the organization.
Now, do an initial sync with the Spacewalk server:
# rhn-profile-sync
Enable Required Background Services
Spacewalk relies on either a real-time messaging daemon or periodic check-ins from registered systems to push management actions. As such, we need to enable the OSA Daemon service and enable all RHN control actions (which Spacewalk uses to push centrally-managed configuration files).
# systemctl enable osad
# systemctl restart osad
# rhn-actions-control --enable-all
Finally, it’s a good idea to do one last profile sync to make sure Spacewalk sees that the required daemons are running:
# rhn-profile-sync
Success!
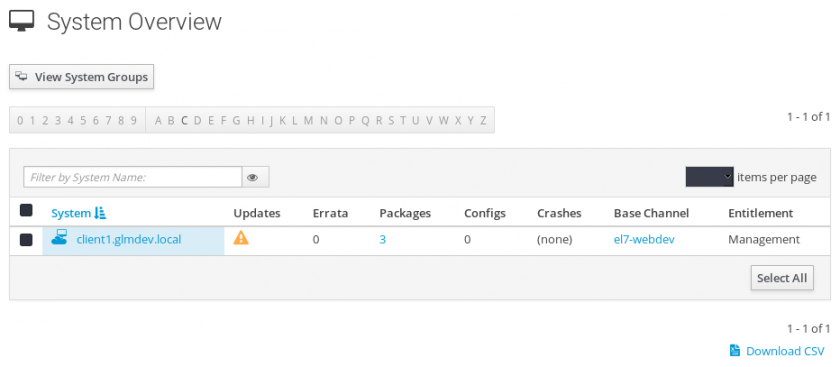
At this point, you should be able to navigate to Spacewalk > Systems and see the newly registered systems.