Flitter is my take on a Javascript web-app framework based on Express. If you haven’t read it, I recommend perusing my introduction here to see what it’s all about. This series of posts will look at creating a basic to-do web-app using Flitter. We’ll cover everything from getting set up to using Flitter, to debugging and running your app in production.
What are we building?
The meat-and-potatoes of our app isn’t that important to the purpose of this tutorial, so we’re going to do something simple. We’re going to build a simple to-do application that allows users to sign in to a web panel, create and store tasks with notes and file attachments. We’ll also allow them to generate public links to share their tasks.
We’ll use Bootstrap for our front-end framework. Any custom styles we need to add will be written in Less. Of course, since Flitter uses the Pug view engine, we’ll be using that too.
Let’s dive in.
1. Getting Set Up
1.1 — Prerequisites
Flitter has a few fairly straightforward system requirements. The installation of each of these on your particular system is beyond the scope of this document, but I’ll link to the install pages for them here:
Node.js 10.x or higher — https://nodejs.org/en/
Yarn package manager — https://yarnpkg.com/en/docs/install
MongoDB server (community edition) — https://www.mongodb.com/download-center/community
Although it’s not required, it’s also very helpful to have Git installed.
1.2 — Grab a copy of Flitter.
I try my best to keep the master branch of the main Flitter repo with the current, working version of Flitter. You can download a ZIP-file of the framework from the main repo link, or you can grab a copy using Git:
$ git clone [https://git.glmdev.tech/flitter/flitter](https://git.glmdev.tech/flitter/flitter) todo-app
This will copy the base framework files to a directory called todo-app/. Now, we need to install the Node.js packages required to run Flitter:
$ cd todo-app/
$ yarn install
Yarn will then install the packages required by Flitter. Because I use Yarn when I develop Flitter, it includes a yarn.lock file that is known good. This means that Yarn will install the exact versions I was using when Flitter worked.
1.3 — Configure the Environment
Flitter uses environment-specific configuration files for things like database credentials and app secrets. We’ll create a .env file with the configuration for our development environment:
SERVER_PORT=8000
LOGGING_LEVEL=1

DATABASE_HOST=127.0.0.1
DATABASE_PORT=27017
DATABASE_NAME=flitter
DATABASE_AUTH=true
DATABASE_USER=flitter
DATABASE_PASS=flitter

SECRET=changemetosomethingrandom
ENVIRONMENT=development
Be sure to edit the database credentials to match your setup. If your development server doesn’t require a login, you can set DATABASE_AUTH=false to disable authentication. Once you modify the configuration values, we’ll check if Flitter can start successfully:
$ ./flitter test
Flitter launched successfully. That doesn't mean that all of your app logic works, just that the framework backend initialized properly.
2. Create the User Auth
We want users to be able to register with/sign-in to our application, so we need to create a basic user-authentication portal. Sounds daunting, right? Well, Flitter makes it easy. Flitter has a built in package called flitter-auth that provides a complete user-portal system out of the box. All we need to do is deploy the files:
$ ./flitter deploy auth
A deployment in Flitter is a non-reversible setup script provided by a package. Various Flitter packages use the deploy command to set up functionality for the first time.
If you look in the app/ directory and its sub-directories, you’ll notice several new files related to user authentication. These were created by flitter-auth when you ran the deploy command.
2.1 — Test it out!
We can now try out the auth portal by launching Flitter and using it. To start Flitter’s HTTP server, run the following command:
$ ./flitter up
Flitter running on port 8000! Press ^C to exit cleanly.
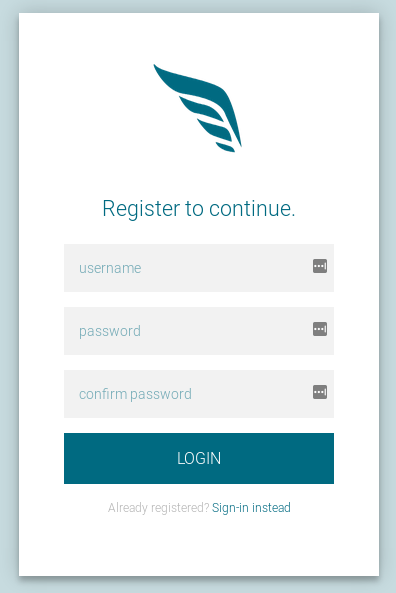 The default Flitter registration page.
Now, you can navigate to localhost:8000/auth/register and you should be greeted with the default Flitter registration page.
To test it out, create a user. You should be redirected to a very simple dashboard. Then, you can log out using the provided button.
To test the sign-in functionality, navigate to: localhost:8000/auth/login and you should be able to get back to the dash with the user credentials you just created.
Et voilà! We have a fully functional user portal. Flitter makes the code for this portal available in the app-space, so we can (and will) modify it later to suit our app better.
3. First Looks

Now that we have a very basic app up and running, let’s take a moment to explore the code we just deployed. We’re going to look at the code provided by the flitter-auth package and use it to get an idea of how Flitter works.
3.1 — Routing
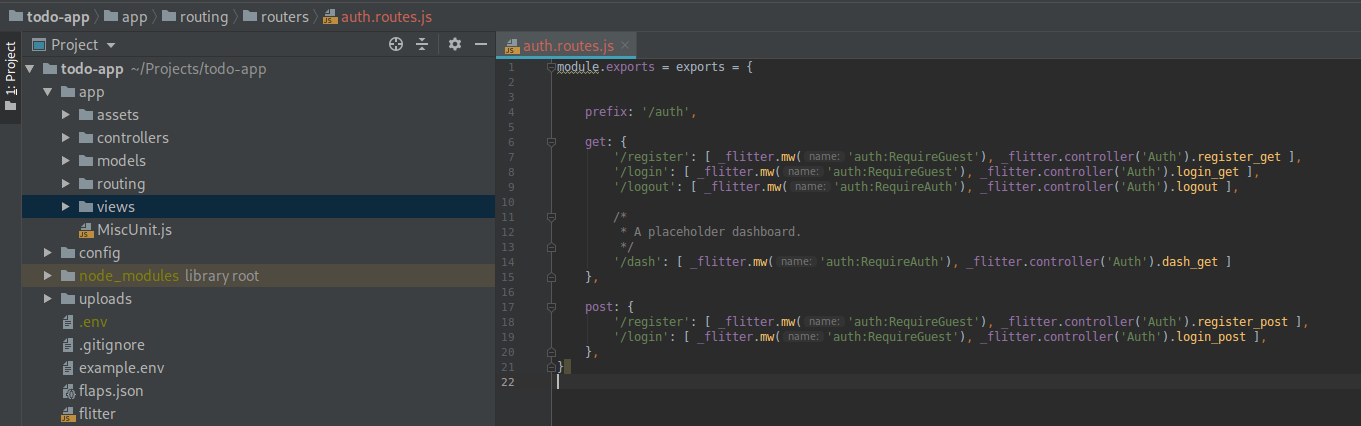
Flitter is an MVC framework. This means that routes are defined in their own separate files. For example, let’s open app/routing/routers/auth.routes.js. There are a lot of comments in there, but if we condense it down to just the code, it looks something like this:
module.exports = exports = {
    prefix: '/auth',

    get: {
        '/register': [ _flitter.mw('auth:RequireGuest'),
                      _flitter.controller('Auth').register_get ],
        '/login': [ _flitter.mw('auth:RequireGuest'),
                   _flitter.controller('Auth').login_get ],
        '/logout': [ _flitter.mw('auth:RequireAuth'),
                    _flitter.controller('Auth').logout ],

        '/dash': [ _flitter.mw('auth:RequireAuth'),
                  _flitter.controller('Auth').dash_get ]
    },

    post: {
        '/register': [ _flitter.mw('auth:RequireGuest'),
                      _flitter.controller('Auth').register_post ],
        '/login': [ _flitter.mw('auth:RequireGuest'),
                   _flitter.controller('Auth').login_post ],
    },
}
In Flitter, there is no code for grouping routes. Rather, routes that should be grouped together are placed in the same file. So, this file is used for all the routes relevant to user authentication. This file exports an object describing a set of routes.
First, we have the prefix. This is pretty straightforward; it’s a prefix applied to all routes in the file. Here, it’s /auth, so the /register route would be accessed at /auth/register.
Next we have the get object. This contains all routes for requests with the GET method. Likewise, there is a corresponding post object.
Both of these two objects contain a number of route definitions. Let’s look at the /register route in the post object. The key is /register which is what Flitter uses as the route — so this route would be accessed by sending a POST request to /auth/register. What follows is an array of functions.
The functions in this array are applied one at a time — in order — as handlers for the route. For the /register POST route, there are two handlers specified. The first is _flitter.mw('auth:RequireGuest'). This applies the auth:RequireGuest middleware to the route (more on that later). _flitter.mw() is a global function for retrieving middleware handlers by name.
The second handler is _flitter.controller('Auth').register_post. This applies the register_post method on the Auth controller (more on that later as well). Again, _flitter.controller() is a global function for retrieving controllers by name.
3.2 — Middleware
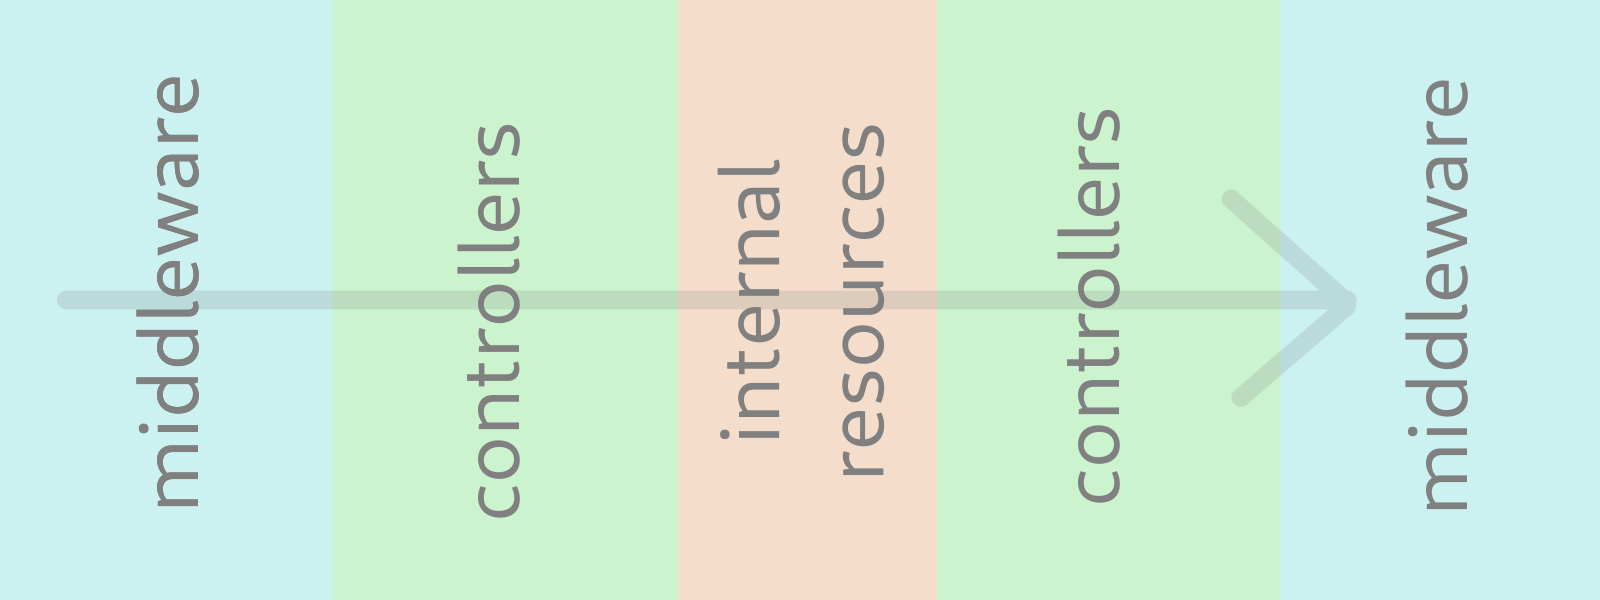 figure 3.2a: A simplified diagram of an MVC request/response flow.
In an MVC framework, middleware is any code that runs between the application logic and the user. That means that, when a request comes in, the middleware is applied, then the request is handled by the controllers, and a response is sent. Before it reaches the user, more middleware may be applied.
In Flitter, each middleware resides in its own file in the app/routing/middleware/ directory. Let’s look at an example. Open the file app/routing/middleware/auth/RequireGuest.middleware.js. If we strip away the comments, we should see something like this:
class RequireGuest {*
    *test(req, res, next){
        if ( req.session && req.session.auth &&
             (req.session.auth.authenticated === true ||
               req.session.auth.user) ){

            return _flitter.view(res, 'errors/requires_guest')
        }

        next()
    }
}

module.exports = RequireGuest
This is a middleware provided by flitter-auth that checks if a user is logged in. If there is an authenticated user, stop the request and display an error page. Otherwise, let it continue through. This middleware is applied to routes like the login and registration pages — pages you don’t want users to be able to access if they have already signed in.
Flitter middleware definitions are pretty straight-forward. Each file contains and exports a class. This class has a function, test() that is called when the middleware is applied. It is passed the request, response, and next() function.
Here, if an authenticated user exists in the session, the middleware calls _flitter.view() to display the errors/requires_guest view (more on that later). This tells the user they’ve tried to access something they’re not allowed to. However, if there isn’t an authenticated user, it calls the next() function, which allows Express to continue processing the request normally.
In Flitter, middleware are assigned names based on their file name. For example, the middleware above exists in the file app/routing/middleware/auth/RequireGuest.middleware.js. When it is loaded by Flitter, it is assigned the name auth:RequireGuest.
You can use these names to apply middleware to routes. This is done via the global _flitter.mw() function. Simply pass the function the name of the middleware you want to apply (see 3.1 for example): _flitter.mw('auth:RequireGuest').
3.3 — Controllers
Controllers are the core of your application. They contain the majority of the logic your application provides, and they are the ultimate handlers of most routes.
In Flitter, controllers are located in the app/controllers/ directory. Let’s look at app/controllers/Auth.controller.js as an example. I’m going to strip out the comments and just focus on one method in the controller, dash_get():
const validator = require('validator')
const bcrypt = require('bcrypt')
const uuid = require('uuid/v4')
*
*class Auth {

    // ... other methods omitted ...

    dash_get(req, res, handle_error){
        return _flitter.view(res, 'auth/dash',
                    { user: req.session.auth.user })
    }
}

module.exports = Auth
Each controller is defined in a file. The file exports a class. The methods on this class should define the logic for how to handle various routes. It’s okay to have methods on a controller that don’t handle routes — that is, they are helper functions for other controller methods — but the primary function of a controller is to handle requests.
Let’s look at the dash_get() method. This method is passed 3 arguments: the Express request, the Express response, and an error handler. It’s not used here, but when you are writing logic in Flitter controllers, you can gracefully handle errors by passing instances of the JavaScript Error class to the handle_error method.
dash_get() is the method responsible for serving the dashboard to authenticated users. It is called if an authenticated user navigates to the /dash route. The actual logic is pretty simple. dash_get() displays the auth/dash view and passes it the user from the session. (More on views later.)
Controller methods should be used in route definitions as the main handlers for our app’s routes. Each controller is assigned a name based on its file name. So, app/controllers/Auth.controller.js is called Auth. Instances of these controllers can be accessed with the global _flitter.controller() helper function.
See 3.1 for examples of how to reference controller methods in route definitions, but for dash_get() it’s as easy as _flitter.controller('Auth').dash_get.
3.4 — Database Models
Data in MVC frameworks are stored in models. A model is simply a defined structure for some type of record that is kept in a database. In Flitter, models are stored in the app/models/ directory. Let’s look at the app/models/User.model.js model provided by flitter-auth:
module.exports = exports = {
    username: String,
    password: String,
    data: String,
    uuid: String,
}
Model files in Flitter export an object that describes the structure of the model. The keys of the object are the names of the fields in the model, and the values are the data type of that field. Flitter uses Mongoose to provide ORM, so you can find more info here at the Mongoose docs. The User model above has 4 fields, each of which contains a string.
Models in Flitter can be accessed using the global _flitter.model() helper function. Models in Flitter are assigned names based on their file name. For example, the model app/models/upload/File.model.js can be accessed with _flitter.model('upload:File'). The _flitter.model() method returns an instance of Mongoose/Model.
3.5 — Static Assets & Views
***3.5.1 — Static Assets ***Flitter makes files placed in the app/assets/ directory directly available as static files on the assets/ route. For example, the file app/assets/flitter.png can be accessed by navigating to http://flitter.url/assets/flitter.png.
Flitter also serves a favicon by default using the express-favicon package. The location of the favicon file is app/assets/favicon.ico. Flitter requires that you provide a favicon file at this path. We provide a default one for you.
3.5.2 — Views A view is just some page that is served to the client. Flitter uses the Pug view engine. Views in Flitter are placed in the app/views/ directory. Again, views are assigned names based on their file name. So, the file app/views/auth/dash.pug can be referenced with the name auth:dash.
To serve a view in Flitter, you can use the global helper method: _flitter.view(). For example, let’s go back to the controller method referenced above:
const validator = require('validator')
const bcrypt = require('bcrypt')
const uuid = require('uuid/v4')
*
*class Auth {

// ... other methods omitted ...

dash_get(req, res, handle_error){
        return _flitter.view(res, 'auth/dash',
                    { user: req.session.auth.user })
    }
}

module.exports = Auth
The call to _flitter.view() here serves the view file app/views/auth/dash.pug. The object passed to the helper method is bound to the view such that its keys can be accessed directly as variables in the view. That is, within the view, the variable user would be defined.
Part I Conclusion
Hopefully this has been a helpful introduction to my Flitter framework. We have a functional app with user authentication abilities, and we didn’t have to write a single line of code. In Part II of this series, we’ll start writing the code specific to our to-do app, and we’ll dive deeper into the practical use of Flitter.
If you’re impatient and want to get started right away, you can find more information about how to use Flitter in the documentation.
As always, let me know if you have questions about any part of this article, and I’ll try my best to help! Be sure to reference the header number of the part you have questions about.
This is the first part in a multi-part series that explores how to develop for Flitter, my Express-based Javascript web app framework. You can find more information about Flitter here.