For a long time now, I've self-hosted most of my online services like calendar, contacts, e-mail, cloud file storage, my website, &c. The current iteration of my setup relies on a series of Ansible playbooks that install all of the various applications and configure them for use.
This has been really stable, and has worked pretty well for me. I deploy the applications to a set of LXC containers (read: lightweight Linux VMs) on Proxmox, a free and open-source hypervisor with an excellent management interface.
Recently, however, I've been re-learning Docker and the benefits of deploying applications using containers. Some of the big ones are:
- Guaranteed, reproducible environments. The application ships with its dependencies, ready to run.
- Portability. Assuming your environment supports the container runtime, it supports the application.
- Infrastructure-as-code. Much like Ansible playbooks, Docker lends itself well to managing the container environment using code, which can be tracked and versioned.
So, I have decided to embark on the journey of transitioning my bare-Linux Ansible playbooks to a set of Kubernetes deployments.
However, there are still some things I like about Proxmox that I'm not willing to give up. For one, the ability to virtualize physical machines (like my router or access point management portal) that can't be easily containerized. Having the ability to migrate "physical" OS installs between servers when I need to do maintenance on the hosts is super useful.
So, I will be installing Kubernetes on Proxmox, and I want to do it on LXC containers.
What We're Building & Rationale
I'm going to deploy a Kubernetes cluster using Rancher's K3s distribution on top of LXC containers.
K3s is a lightweight, production-grade Kubernetes distribution that simplifies the setup process by coming pre-configured with DNS, networking, and other tools out of the box. K3s also makes it fairly painless to join new workers to the cluster. This, combined with the relatively small scale of my deployment, makes it a pretty easy choice.
LXC containers, on the other hand, might seem a bit of an odd choice. Nearly every other article I found deploying K8s on Proxmox did so using full-fat virtual machines, rather than containers. This is certainly the lower-friction route, since it's procedurally the same as installing it on physical hosts. I went with LXC containers for two main reasons:
- LXC containers are fast. Like, almost as fast as bare metal. Because LXC containers are virtualized at the kernel level, they are much lighter than traditional VMs. As such, they boot nearly instantly, run at nearly the same speed as the host kernel, and are much easier to reconfigure with more RAM/disk space/CPU cores on the fly.
- LXC containers are smaller. Because the containers run on the kernel of the host, they need to contain a much smaller set of packages. This makes them require much less disk space out of the box (and, therefore, makes them easier to migrate).
So, to start out, I'm going to create 2 containers: one control node, and one worker node.
Prerequisites
I'm going to assume that you (1) have a Proxmox server up and running, (2) have a container template available on Proxmox, and (3) you have some kind of NFS file server.
This last one is important since we'll be giving our containers a relatively small amount of disk space. So, any volumes needed by Kubernetes pods can be created as NFS mounts.
You'll also want to set up kubectl and helm tools on your local machine.
Creating the LXC Containers
Because our LXC containers need to be able to run Docker containers themselves, we need to do a bit of additional configuration out of the box to give them proper permissions.
The process for setting up the 2 containers is pretty much identical, so I'm only going to go through it once.
In the Proxmox UI, click "Create CT." Make sure you check the box to show advanced settings.
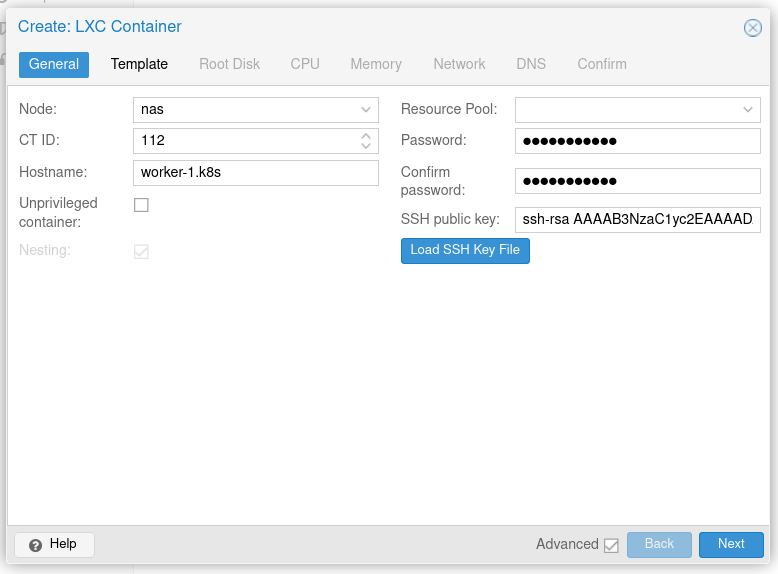
Fill in the details of the container. Make sure to uncheck the "Unprivileged container" checkbox. On the next screen, select your template of choice. I'm using a Rocky Linux 8 image.
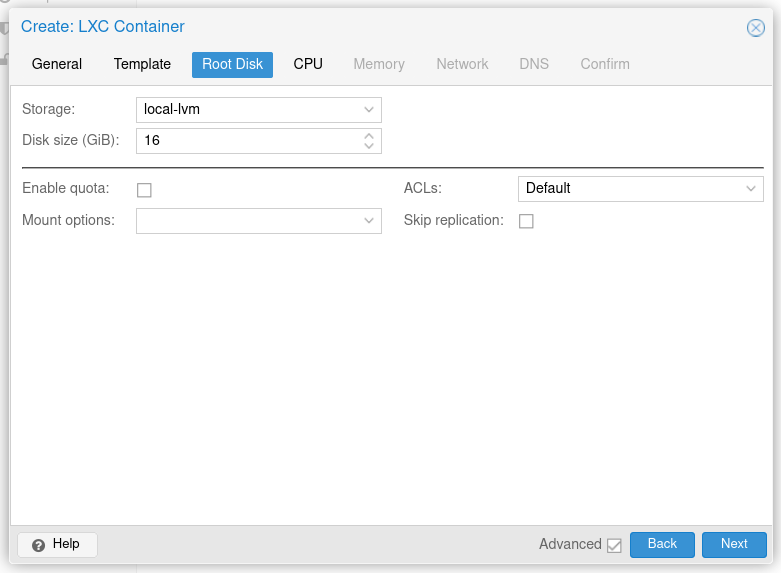
I elected to give each container a root disk size of 16 GiB, which is more than enough for the OS and K3s to run, as long as we don't put any volumes on the disk itself.
The CPU and Memory values are really up to whatever you have available on the host, and the workloads you intend to run on your K8s cluster. For mine, I gave 4 vCPU cores and 4 GiB of RAM per container.
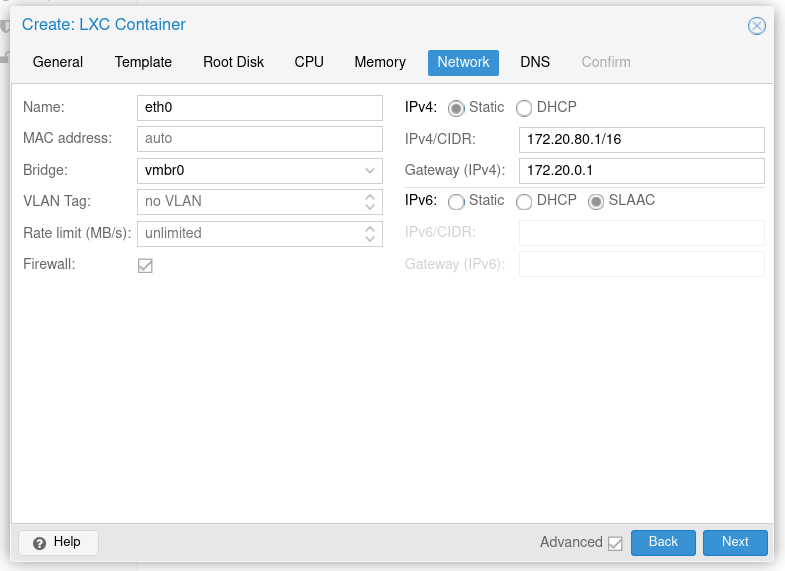
For the network configuration, be sure to set a static IP address for each node. Additionally, if you use a specific internal DNS server (which I highly recommend!), you should configure that on the next page.
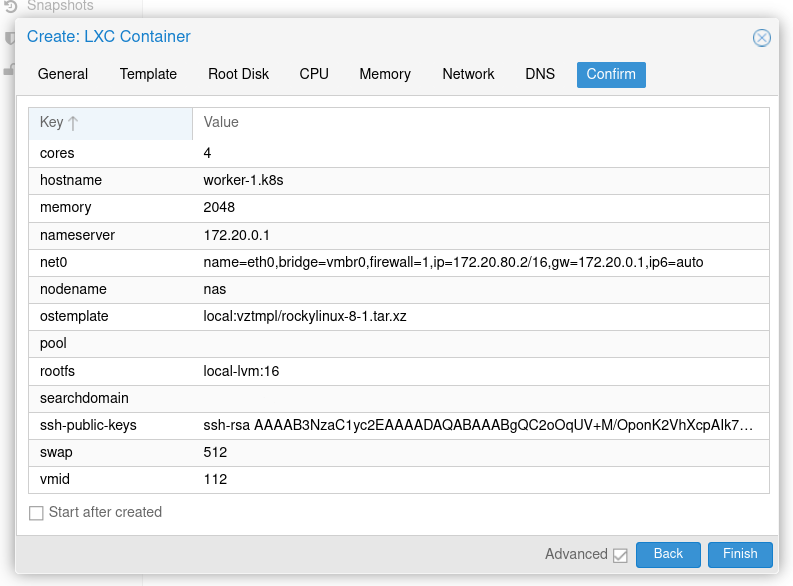
Finally, on the last page, make sure to uncheck the "Start after created" checkbox and then click finish. Proxmox will create the container.
Additional Configuration
Now, we need to tweak a few things under-the-hood to give our containers proper permissions. You'll need to SSH into your Proxmox host as the root user to run these commands.
In the /etc/pve/lxc directory, you'll find files called XXX.conf, where XXX are the ID numbers of the containers we just created. Using your text editor of choice, edit the files for the containers we created to add the following lines:
lxc.apparmor.profile: unconfined
lxc.cgroup.devices.allow: a
lxc.cap.drop:
lxc.mount.auto: "proc:rw sys:rw"
Note: It's important that the container is stopped when you try to edit the file, otherwise Proxmox's network filesystem will prevent you from saving it.
In order, these options (1) disable AppArmor, (2) allow the container's cgroup to access all devices, (3) prevent dropping any capabilities for the container, and (4) mount /proc and /sys as read-write in the container.
Next, we need to publish the kernel boot configuration into the container. Normally, this isn't needed by the container since it runs using the host's kernel, but the Kubelet uses the configuration to determine various settings for the runtime, so we need to copy it into the container. To do this, first start the container using the Proxmox web UI, then run the following command on the Proxmox host:
pct push <container id> /boot/config-$(uname -r) /boot/config-$(uname -r)
Finally, in each of the containers, we need to make sure that /dev/kmsg exists. Kubelet uses this for some logging functions, and it doesn't exist in the containers by default. For our purposes, we'll just alias it to /dev/console. In each container, create the file /usr/local/bin/conf-kmsg.sh with the following contents:
#!/bin/sh -e
if [ ! -e /dev/kmsg ]; then
    ln -s /dev/console /dev/kmsg
fi

mount --make-rshared /
This script symlinks /dev/console as /dev/kmsg if the latter does not exist. Finally, we will configure it to run when the container starts with a SystemD one-shot service. Create the file /etc/systemd/system/conf-kmsg.service with the following contents:
[Unit]
Description=Make sure /dev/kmsg exists

[Service]
Type=simple
RemainAfterExit=yes
ExecStart=/usr/local/bin/conf-kmsg.sh
TimeoutStartSec=0

[Install]
WantedBy=default.target
Finally, enable the service by running the following:
chmod +x /usr/local/bin/conf-kmsg.sh
systemctl daemon-reload
systemctl enable --now conf-kmsg
Setting Up the Container OS & K3s
Now that we've got the containers up and running, we will set up Rancher K3s on them. Luckily, Rancher intentionally makes this pretty easy.
Setup the control node
Starting on the control node, we'll run the following command to setup K3s:
curl -fsL https://get.k3s.io | sh -s - --disable traefik --node-name control.k8s
A few notes here:
- K3s ships with a Traefik ingress controller by default. This works fine, but I prefer to use the industry-standard NGINX ingress controller instead, so we'll set that up manually.
- I've specified the node name manually using the
--node-nameflag. This may not be necessary, but I've had problems in the past with K3s doing a reverse-lookup of the hostname from the IP address, resulting in different node names between cluster restarts. Specifying the name explicitly avoids that issue.
If all goes well, you should see an output similar to:
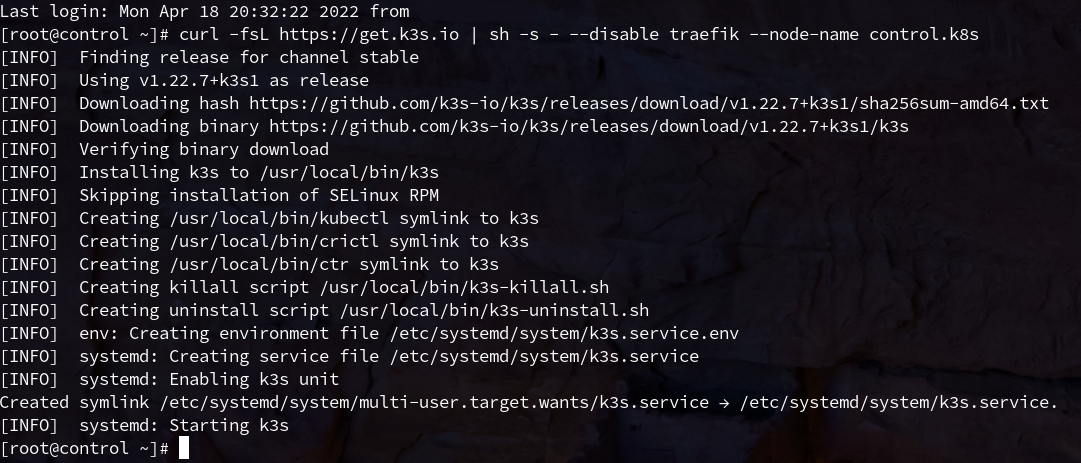
Once this is done, you can copy the /etc/rancher/k3s/k3s.yaml as ~/.kube/config on your local machine and you should be able to see your new (admittedly single node) cluster using kubectl get nodes!
Note: you may need to adjust the cluster address in the config file from
127.0.0.1to the actual IP/domain name of your control node.

Setup the worker node
Now, we need to join our worker node to the K3s cluster. This is also pretty straightforward, but you'll need the cluster token in order to join the node.
You can find this by running the following command on the control node:
cat /var/lib/rancher/k3s/server/node-token
Now, on the worker node run the following command to set up K3s and join the existing cluster:
curl -fsL https://get.k3s.io | K3S_URL=https://<control node ip>:6443 K3S_TOKEN=<cluster token> sh -s - --node-name worker-1.k8s
Again, note that we specified the node name explicitly. Once this process finishes, you should now see the worker node appear in kubectl get nodes:

You can repeat this process for any additional worker nodes you want to join to the cluster in the future.
At this point, we have a functional Kubernetes cluster, however because we disabled Traefik, it has no ingress controller. So, let's set that up now.
Setting up NGINX Ingress Controller
I used the ingress-nginx/ingress-nginx Helm chart to set up the NGINX ingress controller. To do this, we'll add the repo, load the repo's metadata, then install the chart:
helm repo add ingress-nginx https://kubernetes.github.io/ingress-nginx
helm repo update
helm install nginx-ingress ingress-nginx/ingress-nginx --set controller.publishService.enabled=true
Here, the controller.publishService.enabled setting tells the controller to publish the ingress service IP addresses to the ingress resources.
After the chart completes, you should see the various resources appear in kubectl get all output. (Note that it may take a couple minutes for the controller to come online and assign IP addresses to the load balancer.)
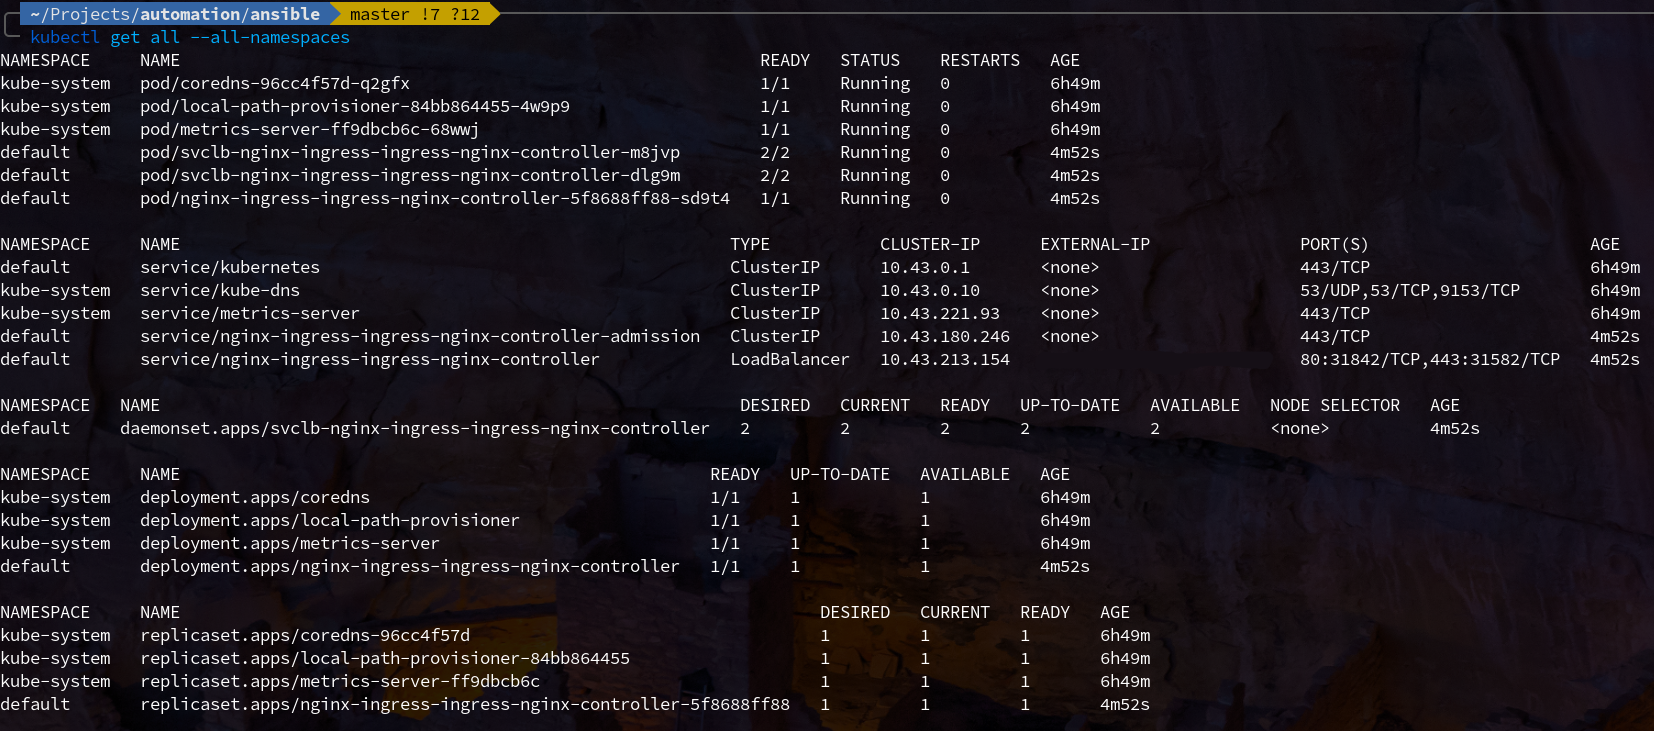
We can test that the controller is up and running by navigating to any of the node's addresses in a web browser:

In this case, we expect to see the 404, since we haven't configured any services to ingress through NGINX. The important thing is that we got a page served by NGINX.
Conclusion
Now, we have a fully-functional Rancher K3s Kubernetes cluster, and the NGINX Ingress Controller configured and ready to use.
I've found this cluster to be really easy to maintain and scale. If you need to add more nodes, just spin up another LXC container (possibly on another physical host, possibly not) and just repeat the section to join the worker to the cluster.
I'm planning to do a few more write-ups chronicling my journey to learn and transition to Kubernetes, so stay tuned for more like this. The next step in this process is to configure cert-manager to automatically generate Let's Encrypt SSL certificates and deploy a simple application to our cluster.